
Windows 10 is possibly the most popular computer operating system with more than 700 million users.
A screenshot is an image taken of whatever’s on your screen. Windows 10 allows users to capture full-screen screenshots, windows based screenshot, and free-form screenshot.
Well, the question of how to take a screenshot on windows 10 might sound obvious to some users.
That said, due to recent windows updates and increment in the tablet-based devices, these are the five most effective ways to take a screenshot on Windows 10.
ALSO READ: Best Windows 10 Themes
Table Of Contents
1. Snip And Sketch
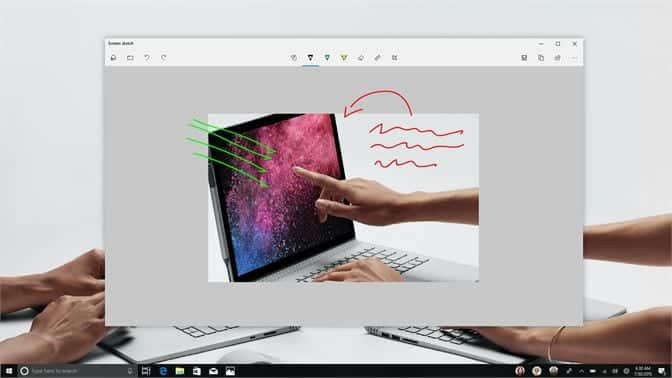
Apart from issues, the Windows 10 October 2018 update also brought some nifty features that were unnoticed by masses. Well, one among these is the new Snip And Sketch tool.
This new tool helps users to screenshot windows and later edit these screenshots before sharing.
Snip And Sketch allow users to take a rectangular, free-form or a full-screen screenshot on Windows 10. Furthermore, your screenshots are automatically saved to the clipboard.
2. Snipping Tool
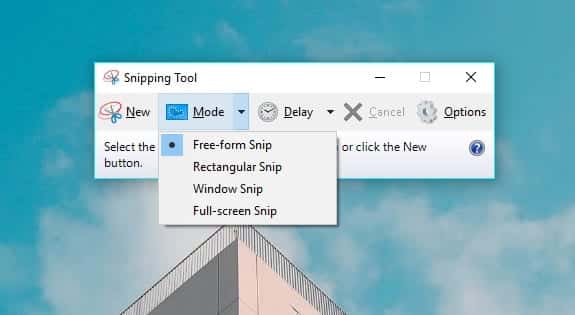
The next popular and reliable method to capture the screen of Windows 10 is by using the Snipping Tool. Similar to Snip And Sketch, Snipping Tool allows users to capture free-form, rectangular, and full-screen screenshot on Windows 10.
Clicking on the New button, you can start capturing the selected part of the screen.
It is worth noting that, its necessary to save screenshots manually before exiting Snipping Tool. Though your selected screenshots are directly saved to the clipboard.
3. Print Screen

Pressing the Print Screen or PrtSc button is possibly the easiest method to take a screenshot on Windows 10. Print Screen captures everything that is being displayed on the screen and saves it to the clipboard.
So as to save this screenshot you can paste it in any image processing program like Microsoft Paint. Overall, PrtSc is one of the fastest methods to share screenshots in Windows 10.
4. Alt + Print Screen
While Print Screen captures a full-screen screenshot, Alt + Print Screen captures the active window screenshot. Similar to PrtSc you need to paste this screenshot in an image processor to save it. That said, the screenshot is automatically saved to the clipboard.
Alt + Print Screen can be useful if you don’t want to share your taskbar or anything on the full-screen of your computer.
5. Windows Logo + Volume Down
The last method to take a screenshot on Windows 10 is ideal for those who use hybrid surface devices. To take a screenshot on Surface devices, simply hold down the Windows logo and press the volume down button.
This process is similar to how we take screenshots on Android and iOS smartphones. These screenshots are automatically saved to the Pictures > Screenshots folder.
Also Read- Best Free Media Players For Windows 10
So these were the five simple methods to take screenshots on Windows 10. Do share any other effective method to take a screenshot on Windows 10 in the comments section.
Related- How To Take A Screenshot On MacOS
