
Slow boot time in Windows 10 is a very frustrating issue.
It typically occurs when there’s a glitch in your Windows operating system or if your hardware takes too long to initiate the operating system.
There have been instances when users have to wait for minutes for Windows to boot on their PC. It can be frustrating if you have to wait longer for your Windows PC to boot up and then only be able to use it.
This article will walk you through the solutions to fix slow boot times in Windows 10, and depending on the root cause of the problem on your PC, one of those fixes should help reduce the amount of time you spend waiting for Windows to boot up.
What Causes Slow Boot Times in Windows 10?
Slow boot time in Windows 10 primarily occurs from software glitches on the computer and hardware issues.
Several factors contribute to delayed boot times on Windows, and they are outlined below.
- Startup Process
- Corrupt System Files
- Fast Startup
- Outdated driver
- Hard drive problem
- Windows Update
- Malware
- Third-party software
While each of the factors mentioned above has its way of slowing down boot times on Windows PCs, the subsequent section of this article will elaborate on how to address these issues by offering solutions tailored to each causative factor.
Fix Slow Boot Times in Windows 10
Wondering how to fix slow boot times in Windows 10? Consider trying the following troubleshooting methods:
1. Disable Fast Startup
The Windows Fast Startup feature operates by storing the system state in the hibernation file and accessing it during system startup to expedite the boot process.
However, in some instances, this approach can inadvertently result in a slowdown during boot. This may occur if the hibernation file, which is crucial for the feature, encounters issues or becomes damaged.
It is advisable to disable this feature temporarily and observe if it improves the boot time. To do so:
1. Press Windows + R, type control panel in the box, and press Enter to open Control Panel.
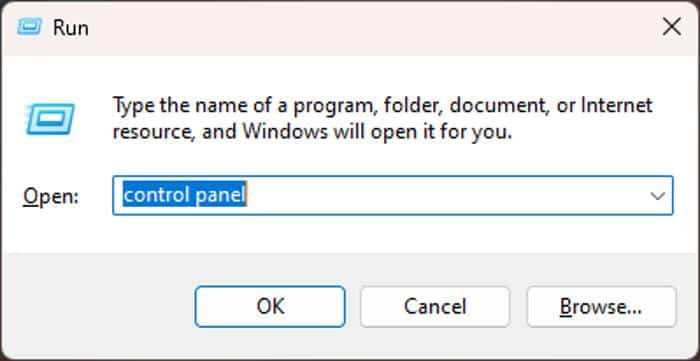
2. On the Control Panel window, set the View by option to Large icons, then navigate to Power Options and click it.
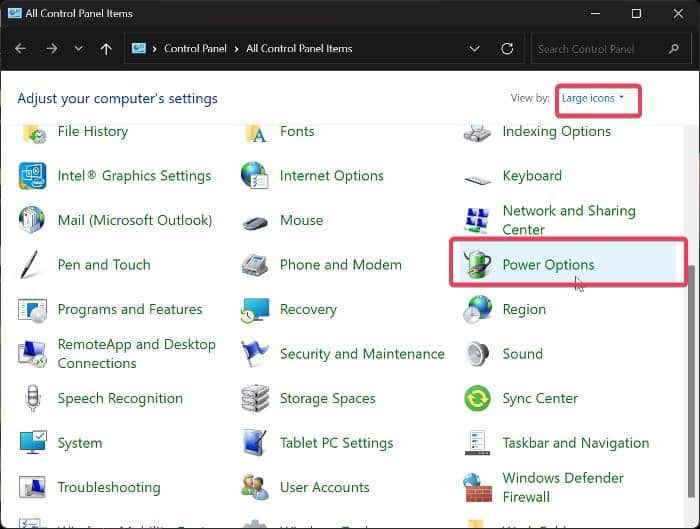
3. Click Choose what the power buttons do on the left pane.
4. Now click the Change settings that are currently unavailable option, then uncheck the Turn on fast startup option under Shutdown settings.
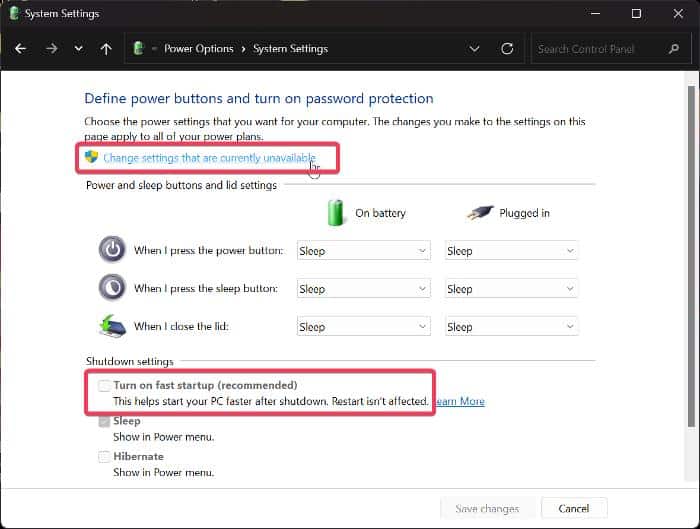
5. Select Save changes at the button-right corner of the window to effect that changes
Now, shut down the computer and power it on again to check if the aforementioned steps have effectively reduced the boot time.
2. Disable Startup Apps
A significant factor contributing to the slowdown of Windows PCs is the presence of unnecessary startup apps. Often, these applications are set to launch during installation and consume a considerable amount of RAM during the boot-up process, consequently impeding the speed of the boot.
To disable unnecessary processes in Windows Startup, follow the steps below:
1. Right-click the taskbar and select Task Manager.
2. Select Startup on the task manager page and right-click the process you wish to disable.
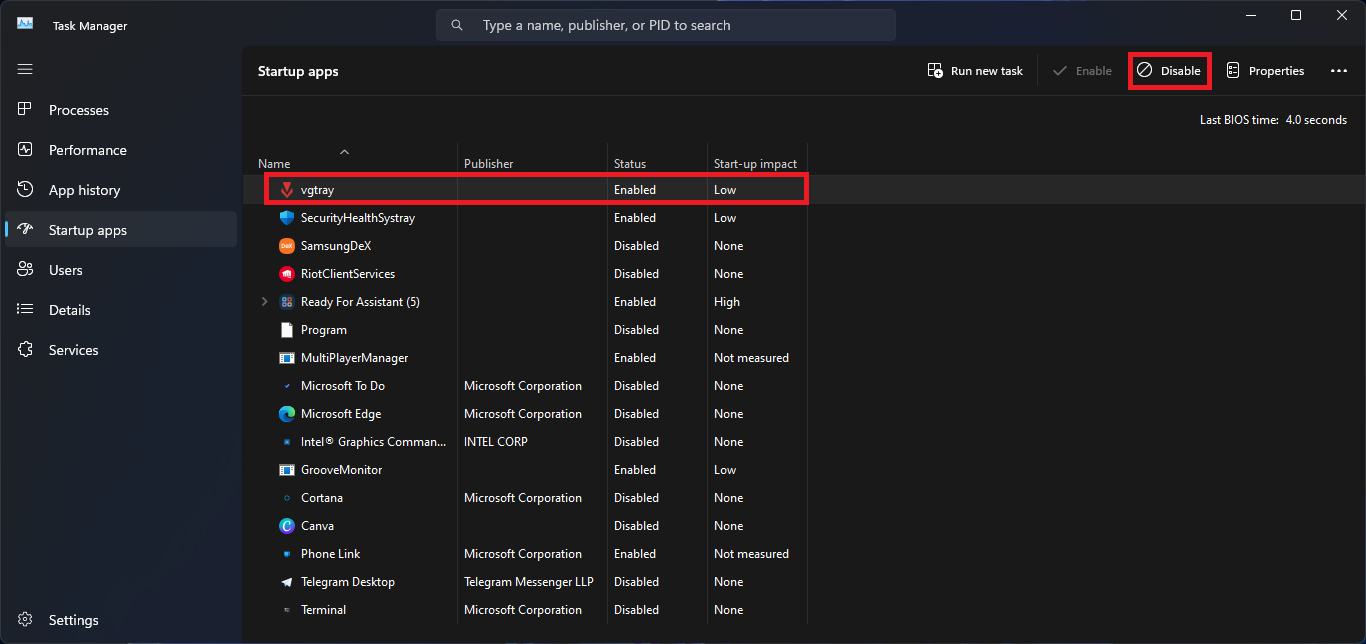
3. Click Disable.
4. Do the same thing for other unnecessary startup apps and you should expect a fast boot time on the PC.
3. Run SFC Scan and DISM Scan
Corrupted or damaged system files can cause delays in the Windows computer’s boot time. To address slow boot times due to corrupt Windows files, you should perform SFC and DISM scans. Here are the steps to carry out these scans:
1. Press Windows + S on your computer to open Windows Search, type cmd, and select Run as administrator on the right pane of the search result.
2. On the Command Prompt window, type the following commands one by one and hit Enter after typing each of them to run the DISM scan:
DISM /Online /Cleanup-Image /CheckHealth
DISM /Online /Cleanup-Image /ScanHealth
DISM /Online /Cleanup-Image /RestoreHealth
3. To run the SFC scan, type the command below and hit Enter:
sfc /scannow
You should shut down your computer after this solution and restart it to see if it has worked.
4. Increase Paging File Size
Not having enough RAM capacity could also be the cause of the slow boot times on your computer. However, with the paging file, you can have enough virtual memory to function as supplementary RAM, allowing your computer to run processes such as the boot process faster. Here’s how to increase the size of your paging file
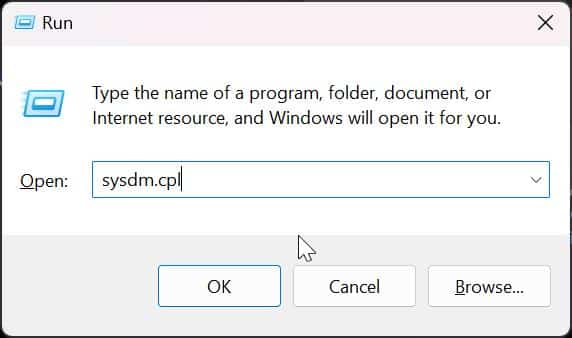
1. Press Windows + R to open the Run dialog box on your computer.
2. Type sysdm.cpl in the box and press Ctrl + Enter to open System Properties as administrator.
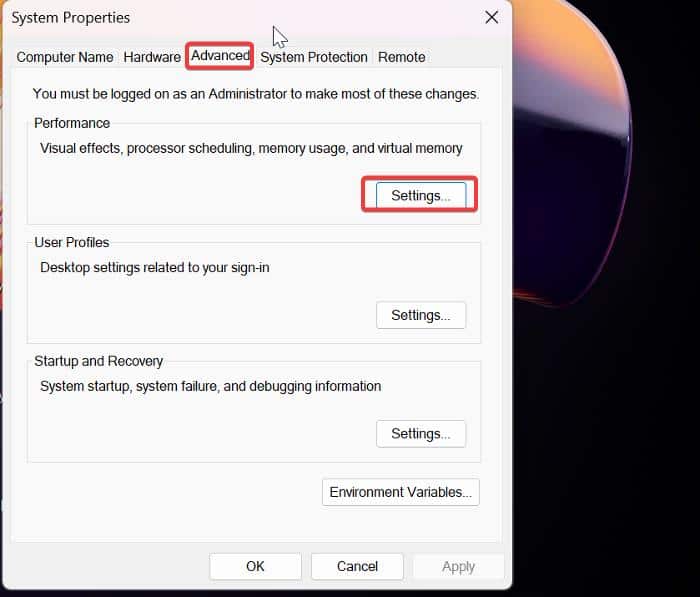
3..Select the Advanced tab on the System Properties dialog box, then click Settings in the Performance section.
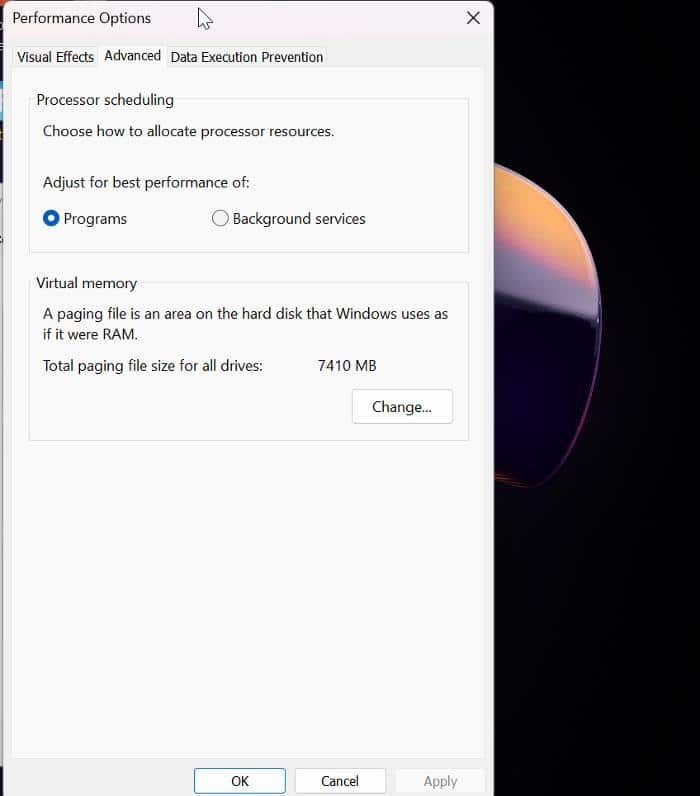
4. In the resulting dialog box (Performance Options), click on the Advanced tab.
5. Then, in the Virtual memory section, click Change to modify virtual memory settings on your computer.
6. You will be directed to the Virtual Memory settings page, where you should uncheck the Automatically manage paging file for all drives box. This will enable you to customize the paging file (pagefil.sys) settings in the dialog box.
7. Now, select the Custom size option, and you’ll be able to edit the previously grayed-out “Initial size” and “Maximum size” settings.
8. Set the appropriate pagefil.sys sizes — in MB — in the Initial size and Maximum size boxes, then click Set.
9. Click OK at the bottom of the Virtual Memory window to close the window.
10. After that, restart your computer for the changes to take effect.
5. Disconnect Peripherals
Connected peripherals may potentially act as a bottleneck to the boot process of your Windows PC. As a result, you should unplug any USB cables or dongles that are connected to your computer and see if that helps minimize boot time.
6. Reinstall Graphics Driver
Drivers are part of the components your Windows PC loads during its booting process. Although this process should be straightforward, a slowdown in boot time can occur if corrupt or outdated drivers are loaded. To address this issue, it is recommended to update essential drivers, including the graphics driver.
Here are the steps to update the graphics driver on your Windows PC:
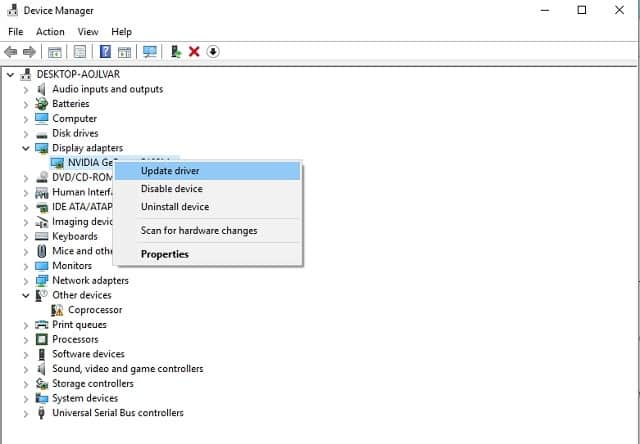
1. Press Windows + X and select Device Manager.
2. Double-click the Display adapters option on the Device Manager window and note the display driver you are having on your computer
3. Go to the display driver’s website and download an updated version of the driver.
4. Now, go back to Device Manager and right-click your display driver.
5. On the resulting drop-down menu, tap on the Update driver option.
6. Select Browse my computer for drivers and follow other on-screen prompts to select the driver package you downloaded earlier.
7. Update Windows
Should your computer’s Windows operating system be overdue for updates, it could contribute to this issue you’re experiencing. To eliminate this potential factor, consider updating Windows on your computer.
1. Press Windows + I to open Settings on your Windows 10 computer.
2. On the Settings window, tap Update & Security and select Windows Update.
3. Click on Check for Updates, and if there is any update available, tap Download and install to start the update process.
8. Defrag Hard Drive
As previously discussed, an issue with your PC hard drive can impede the computer’s speed, particularly noticeable during the Windows boot-up. Defragmenting your hard drive stands out as an effective method to enhance data access speed, consequently expediting processes like booting. To defrag your hard drive:
1. Press Windows + R keys to open the Run command box.
2. Type in dfrgui and press Enter.
3. This will open the Optimize Drives window.
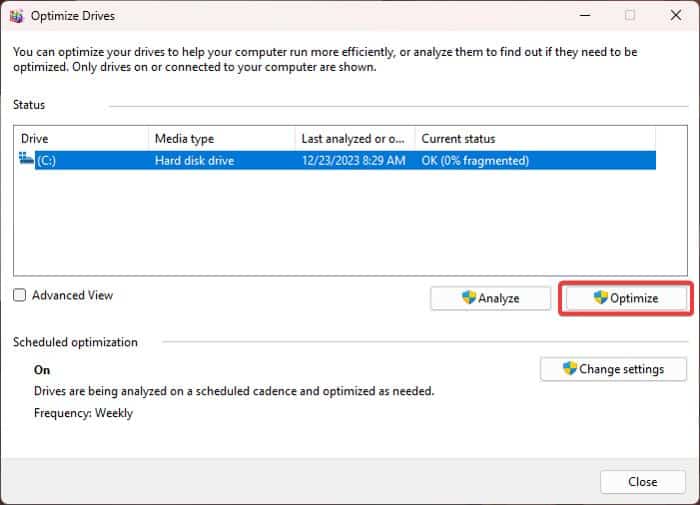
4. Click on the hard drive(s) you want to defragment (the hard drive housing your operating system) and hit Optimize at the bottom of the screen.
5. Then wait till the process finishes and restart your PC.
9. Update BIOS
Updating the BIOS might resolve the issue, but it’s a sensitive process; any errors can lead to significant problems on your computer.
To update the BIOS, download the appropriate update for your motherboard model from your PC manufacturer and install it. Refer to the manual available on your PC manufacturer’s site for guidance.
Before proceeding, identify your motherboard details. Here’s how:
1. Press Windows + S to open the Window Search.
2. Type msinfo in the search box and open the System Information result.
3. On the System Information page, navigate to the Baseboard Manufacturer and Baseboard Product and take note of the values.
This information can then be used to find the BIOS update for your computer and subsequently fix the issue.
10. Reinstall Windows
If all other troubleshooting attempts prove unsuccessful, and your computer typically has swift boot times, you might want to contemplate reinstalling the Windows operating system on your computer.
Also Read:
Wrap Up
The troubleshooting methods in this article can address slow boot times in Windows 10 within their respective scopes. If all these solutions prove ineffective, the issue may be hardware-related.
In such cases, contemplating an upgrade to SSD or RAM could be necessary, as they might be contributing to the slow boot times in your Windows 10 system.
