

Windows updates keep your PC secure and running smoothly. But it’s pretty common for them to get stuck in a “pending download” or “pending install” state on Windows 10 and 11.
When an update is marked as pending, Windows has found the update files but can’t finish downloading or installing them.
This usually happens because of a glitchy background service, a network hiccup, or a corrupted update cache. Plus, we can rule out the possibility that you paused the updates yourself.
Fortunately, there are several fixes that has helped lots of Windows 11/10 user get it fix.
But first, let’s break down why it happens. Then, we’ll walk through the solutions to get your pending updates installed.
What Causes Windows Updates to Get Stuck as Pending?
It can be hard to pin down the exact reason an update stays pending, because Windows Update relies on several background services, network protocols, and storage processes.
Usually, the issue occurs when the download process gets interrupted or when a temporary cache file becomes corrupted, preventing Windows from executing the installation phase.
But here are the most common I’ve seen that cause the pending Windows updates issues:
- Unstable Internet Connection: Interruptions during file download force updates into a pending state.
- Corrupted Download Cache: Damaged temporary files inside the SoftwareDistribution directory.
- Stopped Background Services: Disabled or hanging services like BITS or wuauserv.
- Corrupted System Files: Missing core system files preventing Windows from applying patch packages.
- Storage Space Constraints: Insufficient free space on the system drive (C:) to extract updates.
- Third-Party Antivirus Interference: Security software blocking connection to Microsoft update servers.
Addressing this issue ensures your PC receives critical security patches and feature improvements.
How to Install Pending Windows Updates in Windows 11/10
Before you try the main solutions, I recommend you do the following first:
- Restart your PC
- Check your internet connection
- Make sure you have at least 10 to 15 GB of free space on your main drive
Now if the updates are still pending, here are the solutions you should perform:
1. Force Manual Download and Install in Windows Update
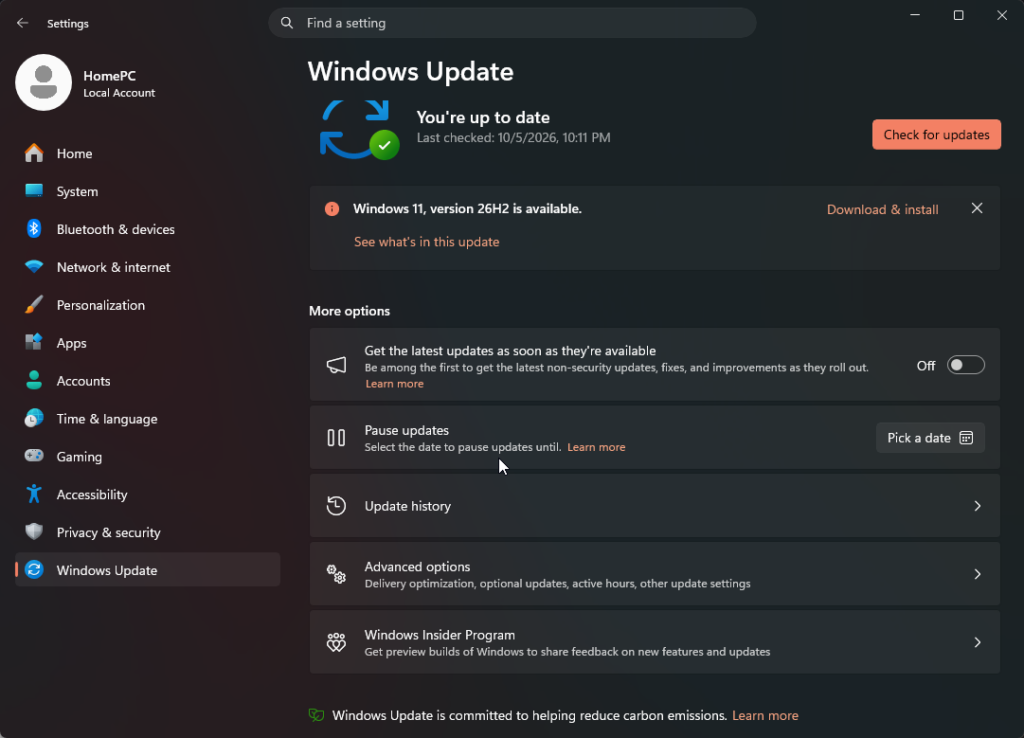
Sometimes Windows pauses updates automatically to avoid high network usage or to wait for your confirmation. You can manually force it to start the download and installation. Here’s how:
- Press Windows + I to open the Settings menu.
- Click on Windows Update (on Windows 11) or Update & Security > Windows Update (on Windows 10).
- Look for any update with a Download now, Install now, or Restart now button next to it and click it.
- If no button is visible, click Check for updates at the top right to refresh the update queue.
Afterward, watch the progress bar under the update name. Once it’s done, restart your PC if prompted and check if the issue is resolved.
2. Run the Windows Update Troubleshooter
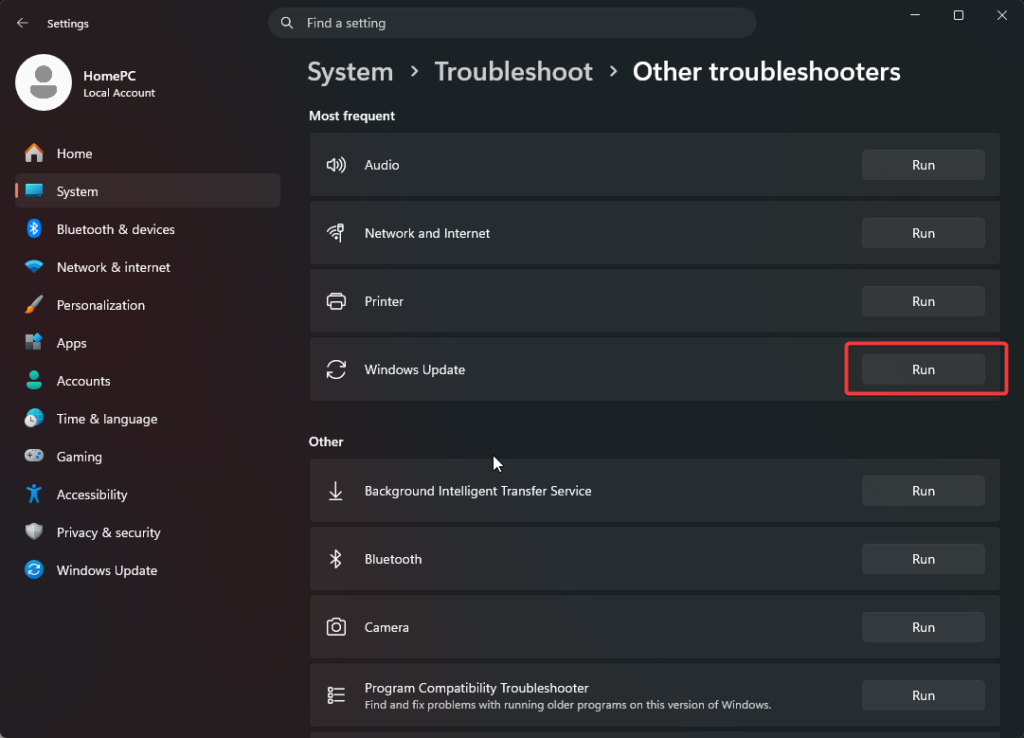
Windows has a built-in troubleshooter that can detect and fix common update problems, including stuck update queues. Here’s how to run it:
- Press Windows + I to open Settings.
- On Windows 11, go to System > Troubleshoot > Other troubleshooters. On Windows 10, go to Update & Security > Troubleshoot > Additional troubleshooters.
- Locate Windows Update and click Run (or Run the troubleshooter).
- Let the scan finish and apply any fixes the wizard recommends.
Once it’s done, go back to the Windows Update page and check if the pending updates start downloading.
3. Restart Windows Update Services
If an essential background service freezes or stalls, Windows can’t finish installing updates. Stopping and restarting these services should clear any temporary locks. Here’s how:
- Press Windows + S, type cmd, right-click Command Prompt, and select Run as administrator.
- Type the following commands one by one, pressing Enter after each, to stop the update services:
net stop wuauserv

net stop cryptSvc

net stop bits

net stop msiserver - Next, type these commands one by one, pressing Enter after each, to start the services again:
net start wuauserv

net start cryptSvc

net start bits

net start msiserver - Close the Command Prompt window.
- Go back to Settings > Windows Update to see if the pending updates resume installing.
4. Clear the SoftwareDistribution Folder
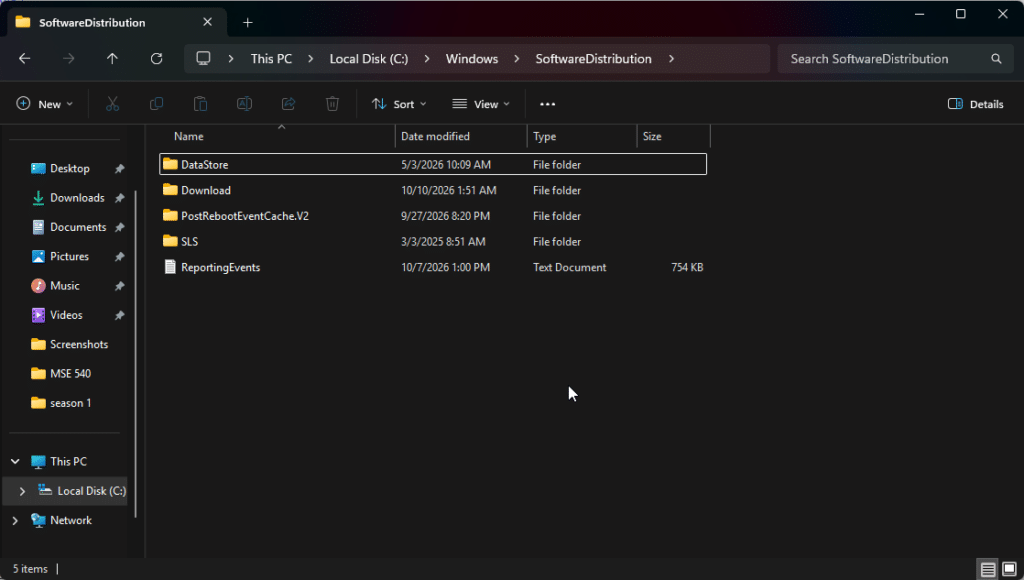
Think of the SoftwareDistribution folder as a waiting room for update files. Windows stores the downloaded updates there temporarily, so if any of them get corrupted, your updates can stay stuck as pending.
Note: Make sure you stop the Windows Update service before clearing this folder (steps 1 and 2 below), otherwise Windows will block the deletion.
Here’s how to clear it:
- Press Windows + R to open the Run dialog box, type services.msc, and press Enter.
- Scroll down to Windows Update, right-click it, and select Stop.
- Press Windows + E to open File Explorer and go to
C:\Windows\SoftwareDistribution. - Select everything inside the folder by pressing Ctrl + A, then hit Delete.
- Return to the Services window, right-click Windows Update, and select Start.
- Open Windows Update in Settings and click Check for updates so Windows can re-download fresh update packages.
5. Run the SFC and DISM Scans
Corrupted system files can stop the Windows Update installer from running patch scripts as I’ve mentioned earlier. The effective way to fix this is by running the System File Checker (SFC) and DISM scans can repair those files and help restore stability. Here’s how:
- Press Windows + S, type cmd, and select Run as administrator on the right pane.
- In Command Prompt, type the following command and hit Enter to run the DISM scan:
DISM /Online /Cleanup-Image /RestoreHealth - Wait for the DISM scan to complete fully.
- Then, run the SFC scan by typing the command below and hitting Enter:
sfc /scannow - Afterward, restart your computer.
Once it’s back on, head to Windows Update and check if the pending updates can now install without errors.
6. Reset Windows Update Components via Command Prompt
If clearing the folder manually didn’t work, renaming the update cache folders through Command Prompt forces Windows to create fresh ones. Here’s how:
- Open Command Prompt as administrator via Windows Search.
- Stop the core services by entering the following commands (press Enter after each):
net stop wuauserv

net stop cryptSvc

net stop bits

net stop msiserver - Rename the update cache folders with these commands:
ren C:\Windows\SoftwareDistribution SoftwareDistribution.old

ren C:\Windows\System32\catroot2 catroot2.old - Restart the update services with these commands:
net start wuauserv

net start cryptSvc

net start bits

net start msiserver - Close Command Prompt and restart your PC.
- Reopen your update settings and check if the pending list resets and the downloads resume normally.
7. Install Updates Manually via Microsoft Update Catalog
If a specific Knowledge Base (KB) update is stuck as pending, you can download its standalone installer straight from Microsoft and install it manually. Here’s how:
- Open Settings > Windows Update and take note of the KB number of the pending update (e.g., KB5034765).
- Open your web browser and go to the official Microsoft Update Catalog website.
- Enter the KB number in the search bar and press Enter.
- Find the version that matches your system architecture (x64, x86, or ARM64) and Windows build, then click Download.
- Run the downloaded .msu file and follow the on-screen prompts to finish the installation.
- Once it’s installed, restart your PC and check Update history in Windows Update to confirm it’s listed.
8. Use the Windows 11/10 Installation Assistant
If a pending feature update keeps failing through Settings, Microsoft’s official update assistant can install it directly on your current setup. Here’s how:
- Visit the official Microsoft download page for Windows 11 or Windows 10.
- Download the Windows 11 Installation Assistant (or Windows 10 Update Assistant).
- Launch the downloaded tool and select Accept and Install.
- Let the tool verify your system and process the update.
- After your PC restarts, go to Settings > System > About to confirm you’re on the latest OS build.
9. Revert Pending Actions with DISM
This one is a last resort, so only try it if the fixes above didn’t work. It tells Windows to cancel the update actions that are stuck. Microsoft only supports this command from the recovery environment, so you’ll need to run it from there. Here’s how:
- Press Windows + I to open Settings.
- On Windows 11, go to System > Recovery. On Windows 10, go to Update & Security > Recovery.
- Under Advanced startup, click Restart now.
- After the restart, select Troubleshoot > Advanced options > Command Prompt.
- Type
dir C:and press Enter. If you don’t see a Windows folder in the list, trydir D:instead. Use whichever drive letter has the Windows folder. - Run the command below, replacing C with your Windows drive letter if it’s different:
DISM /Image:C:\ /Cleanup-Image /RevertPendingActions - Once it completes, close Command Prompt and select Continue to boot back into Windows.
- Open Windows Update and click Check for updates to see if the pending list has reset.
Frequently Asked Questions
Why does a Windows update say “Pending Install” after restarting?
A “Pending Install” status following a reboot usually indicates that background installer scripts were blocked from replacing system files during startup. This is frequently caused by third-party antivirus tools, corrupted temporary setup files, or low disk space. Running the Windows Update Troubleshooter or clearing the SoftwareDistribution directory generally resolves this lock.
How long should a Windows update stay pending?
Under standard operating conditions, an update should only remain in a pending state for a few minutes while Windows allocates system resources. If an update status stays pending for longer than 30–60 minutes without download or installation progress, the update loop is likely frozen and requires manual fixes.
Will clearing the SoftwareDistribution folder delete my personal files?
No. The SoftwareDistribution directory only stores temporary cache files used by Windows Update to stage installation files. Deleting its contents will not affect your personal documents, media, or installed programs. Windows will automatically rebuild this folder the next time you scan for updates.
Wrap Up
Windows Update getting stuck on Pending Download or Pending Install can be frustrating, especially when important security updates and bug fixes are waiting to be installed. Fortunately, most of these issues can be resolved without reinstalling Windows or losing personal files.
Start with simple solutions such as restarting your PC, checking your internet connection, resuming paused updates, and running the Windows Update Troubleshooter. If the problem continues, restarting Windows Update services, clearing the update cache, or repairing corrupted system files using DISM and SFC can help.
For updates that still refuse to install, you can download the appropriate package directly from the Microsoft Update Catalog.
Whether you’re using Windows 11 or Windows 10, following these troubleshooting methods in order should help you identify the cause and get pending Windows updates downloading and installing again.