

Your PC’s camera is one of those things you probably don’t think about until an app asks to use it—or worse, starts using it when you don’t expect it. From video conferencing tools like Zoom and Microsoft Teams to web browsers and other installed applications, several programs may request access to your webcam.
Fortunately, Windows 11 and Windows 10 let you manage camera permissions, allowing you to choose which supported apps can access your camera and when. You can enable or disable camera access, change permissions for individual apps, and control webcam access for desktop applications through Windows privacy settings.
However, camera permissions work differently for Microsoft Store apps and traditional desktop programs, which can make things confusing when you’re trying to block a specific application.
In this guide, we’ll walk you through how to manage camera permissions in Windows 11 and Windows 10, including allowing or blocking camera access, changing app-specific settings, disabling your webcam, and fixing common camera permission problems.
How Camera Permissions Work in Windows 11/10
Before changing anything, it helps to know the four layers Windows uses, because a setting higher up the chain overrides everything below it:
- Camera access (device level): The master switch for the entire device. If this is off, nothing on the PC can use the camera regardless of every other setting.
- Let apps access your camera: Controls whether Microsoft Store apps can use the camera at all.
- Individual app toggles: The per-app list Let apps access your camera, where you allow or deny each Store app one by one.
- Let desktop apps access your camera: A single toggle covering every desktop app installed outside the Microsoft Store.
Note: Desktop apps can't be controlled individually. This is the part that catches people out. Chrome, Microsoft Edge, Zoom, and Microsoft Teams are all desktop apps, so they're governed by that one blanket toggle. If you want to restrict a specific desktop app, you'll have to do it inside that app's own settings.
How to Check Which Apps Have Camera Access
Start by seeing where things currently stand:
1. Press Windows + I to open the Settings app.
2. Select Privacy & security from the sidebar, then click Camera under App permissions. On Windows 10, go to Privacy and select Camera instead.
3. Look under Let apps access your camera and you’ll see every Microsoft Store app that has requested camera access, along with its current toggle state.
4. Scroll further down to Let desktop apps access your camera. Windows also lists which desktop apps have recently used your camera here, which is a useful way to spot anything you didn’t expect.
Tip: You can jump straight to this page by pressing Windows + R and running ms-settings:privacy-webcam.
Method 1: Manage Camera Permissions Through Windows Settings
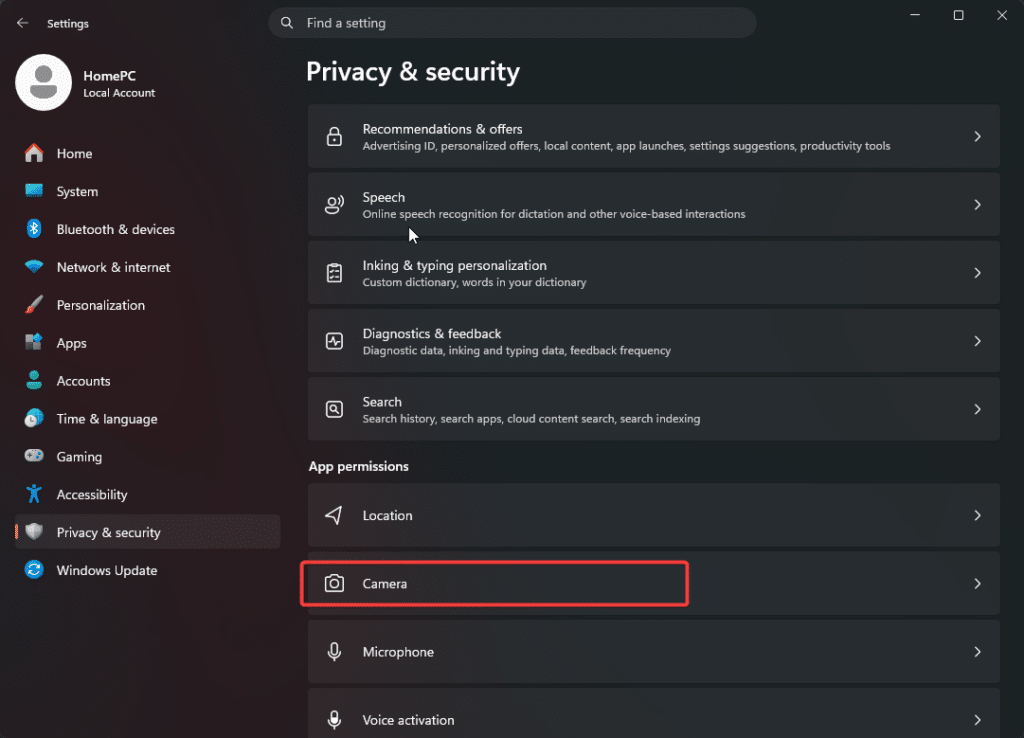
This is the method most people should use, and it covers everything short of enforcing policy across multiple accounts:
1. Press Windows + I to open Settings, then go to Privacy & security > Camera (or Privacy > Camera on Windows 10).
2. Make sure Camera access is turned On if you want any app on the device to use the camera. On Windows 10, this is under Allow access to the camera on this device, and you’ll need to click the Change button first.
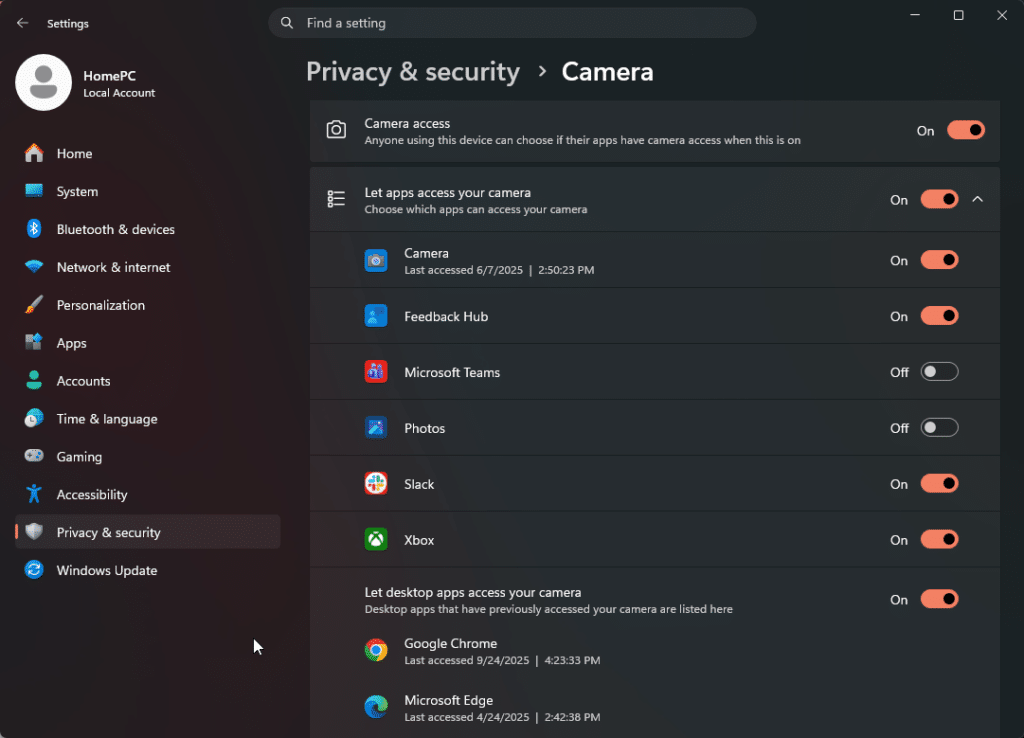
3. Turn Let apps access your camera on to allow Microsoft Store apps through.
4. Go through the list of individual apps beneath it and toggle each one on or off depending on whether you want it to have access.
5. Turn Let desktop apps access your camera on or off depending on whether apps like Zoom, Teams, or your browser should be able to use it.
Note: If the Camera access toggle is greyed out and won’t change, an administrator or a policy is controlling it. Sign in with an admin account, or check the Group Policy method below.
Method 2: Block or Force Camera Access Using Group Policy Editor
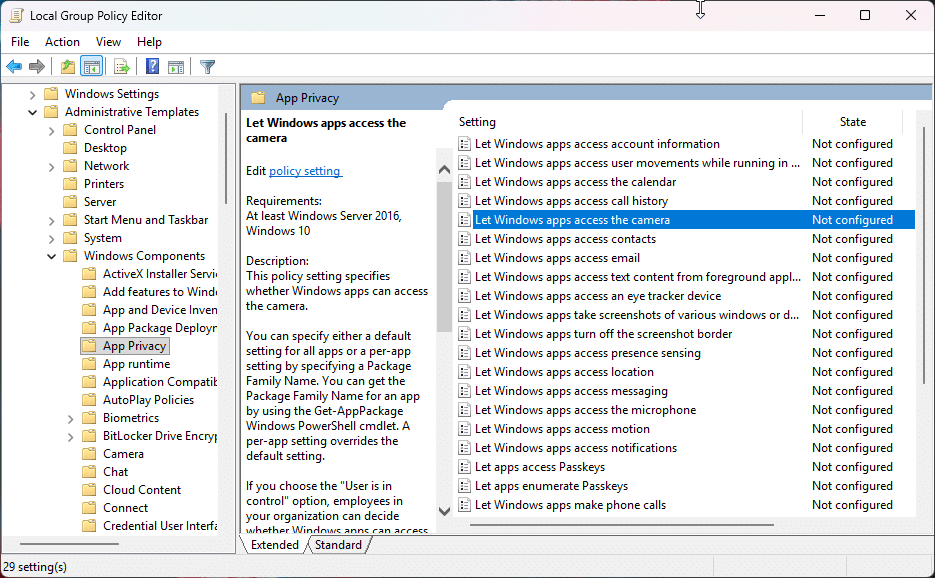
If you want a setting that users can’t simply toggle back on, Group Policy is the way to do it. Keep in mind this is only available on Windows 11/10 Pro, Enterprise, and Education, so Home users should skip to the Registry method:
1. Press Windows + R, type gpedit.msc, and press Enter.
2. Navigate to Computer Configuration > Administrative Templates > Windows Components > App Privacy.
3. Double-click the Let Windows apps access the camera policy.
4. Select Enabled, then set the behaviour you want under Options:
- Force Allow: All apps get camera access and users can’t turn it off.
- Force Deny: No app gets camera access and users can’t turn it on.
- User is in control: Users manage their own permissions through Settings as normal.
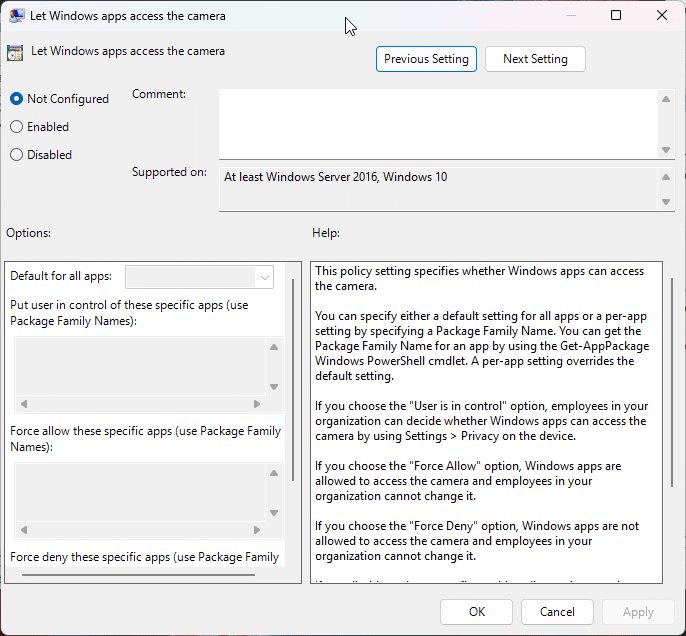
5. Click Apply, then OK.
6. Open Command Prompt and run the command below to apply the policy immediately:
gpupdate /force
There’s also a separate policy at Computer Configuration > Administrative Templates > Windows Components > Camera called Allow Use of Camera. Setting that one to Disabled blocks the camera across the whole system, including desktop apps, which the App Privacy policy above doesn’t cover.
Method 3: Manage Camera Permissions Using Registry Editor
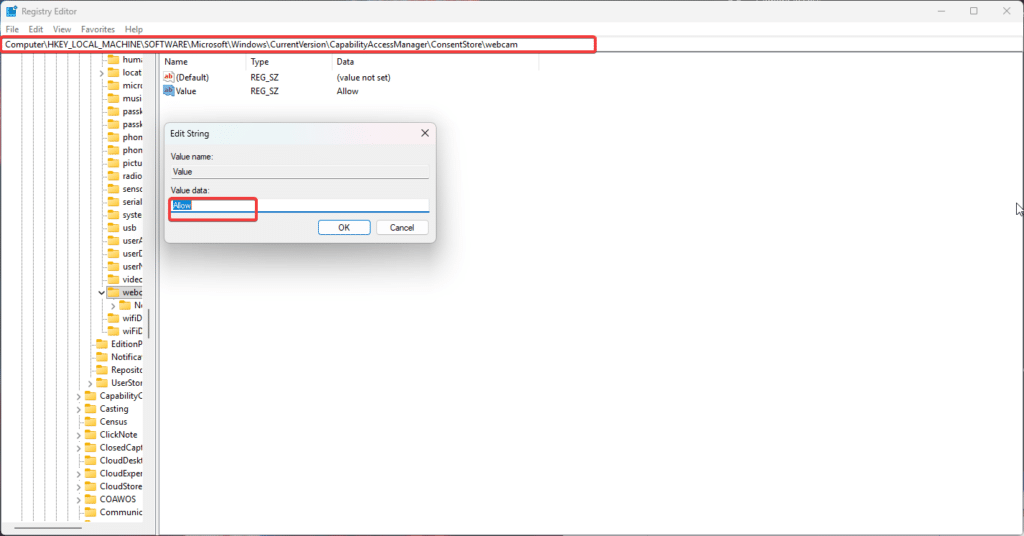
If you’re on Windows 11/10 Home and don’t have Group Policy Editor, you can achieve the same system-wide control through the Registry. As always, back up your registry or create a System Restore Point before making changes:
1. Press Windows + R, type regedit, and press Enter.
2. Navigate to the following key:
HKEY_LOCAL_MACHINE\SOFTWARE\Microsoft\Windows\CurrentVersion\CapabilityAccessManager\ConsentStore\webcam
3. In the right pane, double-click the Value string (REG_SZ). If it isn’t there, right-click the empty space, select New > String Value, and name it Value.
4. Set the value data to Deny to block camera access system-wide, or Allow to permit it.
5. Close the Registry Editor and restart your PC.
Note: The same key exists under HKEY_CURRENT_USER if you only want to change permissions for your own account instead of the whole machine.
Method 4: Disable the Camera Entirely from Settings
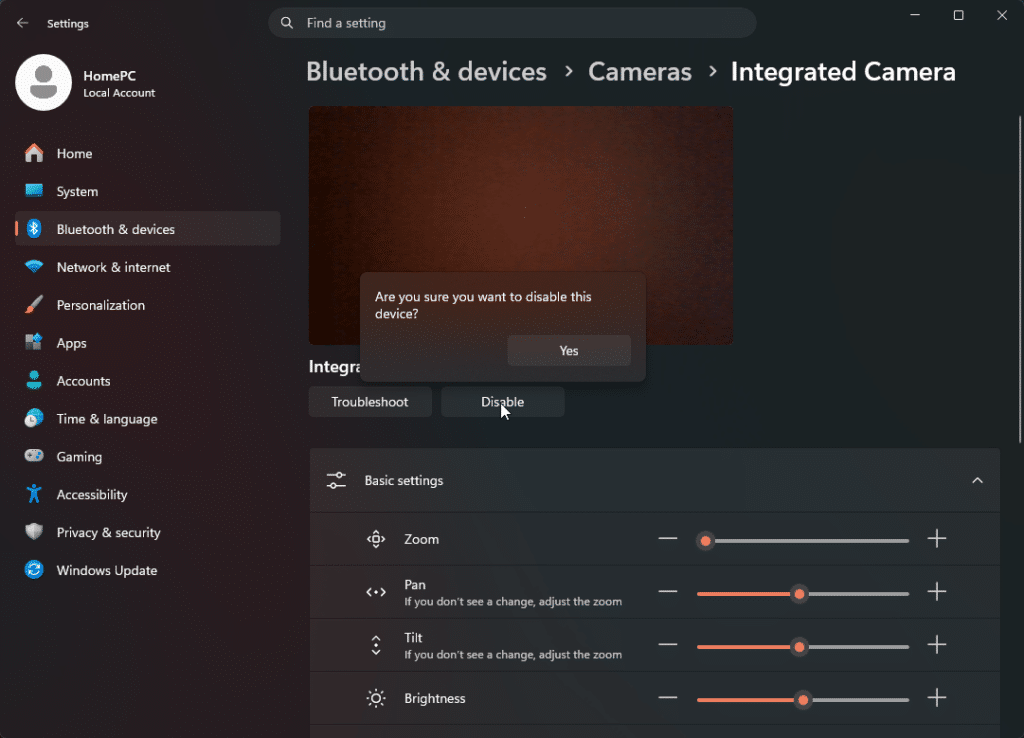
If you’d rather the camera not be available at all, Windows 11 lets you disable the hardware itself rather than juggling permissions:
1. Press Windows + I to open Settings.
2. Go to Bluetooth & devices and select Cameras.
3. Under Connected cameras, click the camera you want to turn off.
4. Click Disable, then click Yes to confirm.
To turn it back on later, return to the same page and select the camera under Disabled cameras, then click Enable. You’ll need admin rights for both actions, and on some PCs disabling one camera also disables others, so Windows will warn you when that’s about to happen.
Troubleshooting Camera Permission Issues
1. The Settings app crashes when you open Camera or Microphone permissions: This is a known issue that started showing up after the KB5068861 security update on Windows 11 25H2, where the Settings app closes the moment you click into camera or microphone permissions. Install any pending Windows updates first, since Microsoft typically patches this in a follow-up release. If that doesn’t help, repair your system files by opening Command Prompt as administrator and running these two commands in order:
DISM /Online /Cleanup-Image /RestoreHealth
sfc /scannow
If the Settings app still crashes, reset it through Settings > Apps > Installed apps, click the three dots beside Settings, select Advanced options, and click Reset.
2. An app isn’t showing up in the permissions list: Apps only appear after they’ve requested camera access at least once, so open the app and try to use the camera, then check the list again. If it still isn’t there, it’s a desktop app rather than a Store app, and it’s covered by the single desktop apps toggle instead.
3. Your camera says it’s blocked even though every permission is on: Check for a physical privacy shutter or a keyboard kill switch first, as a lot of laptops have one on an Fn key or as a slider beside the lens. After that, fully close any other app that might be holding the camera, since Windows only lets one app use it at a time. If the problem persists, check whether your antivirus is blocking camera access, as several security suites include camera protection that overrides Windows permissions.
4. The camera is disabled in BIOS: Some business laptops let you disable the webcam at firmware level, which means Windows can’t see it no matter what your permissions say. Restart the PC and press F2, F10, or Delete during startup depending on your manufacturer, then look for the camera or integrated devices section and make sure it’s enabled.
5. Camera stopped working right after changing permissions: Restart the app you’re using so it picks up the new permission state, and restart your PC if that doesn’t do it. Permission changes don’t always apply to apps that were already running.
Tips for Managing Camera Privacy
Windows Hello ignores your camera permissions: If you sign in with Windows Hello face recognition, the camera still works for sign-in even with Camera access turned off. This is by design. Turn off Windows Hello face sign-in if you want the camera fully unusable.
Permissions can reset after feature updates: Windows feature updates occasionally restore permission defaults, so it’s worth revisiting the Camera page after a major update rather than assuming your settings survived.
A physical cover is still the most reliable option: Software permissions can be overridden by policies, malware, or firmware settings. A sliding cover or a piece of tape can’t be.
Review the list every so often: Apps accumulate permissions quietly over time. Going through the list every few months and revoking access from anything you no longer use takes a minute and closes off a lot of unnecessary exposure.
Final Thoughts
Managing camera permissions in Windows 11/10 mostly comes down to understanding that the settings are layered, with the device-level switch overriding everything below it and desktop apps sitting behind a single toggle you can’t break down further. For most people, the Settings app is all you need. If you’re locking down a shared or work machine, Group Policy or the Registry gives you control that users can’t undo.
Frequently Asked Questions
Why can’t I turn off camera access for a specific desktop app?
Windows doesn’t offer per-app control for desktop apps, only a single toggle covering all of them. To restrict one specific desktop app, you’ll need to change the camera setting inside that app itself.
Why does my camera still work when Camera access is turned off?
If you use Windows Hello face sign-in, Windows will still use the camera to sign you in regardless of the permission setting. Some desktop apps installed outside the Microsoft Store may also bypass these settings, which is why a physical cover is worth having.
Why is the Camera access toggle greyed out?
The setting is being controlled by an administrator account or a Group Policy. Sign in as an administrator, or check the Let Windows apps access the camera policy in gpedit.msc and set it back to Not Configured.
Does turning off camera permissions disable my webcam completely?
No. It only stops apps from using it. To disable the hardware itself, go to Settings > Bluetooth & devices > Cameras and disable the camera there, or disable it in Device Manager.