How to Downgrade Windows 10 to Window 7 or 8.1
Windows 10 has been a successful launch for Microsoft with a million plus users and hoping to reach a billion users in three years. But there are many among you who dont like Windows 10 for various reasons and may want to go back to your old Windows 7/8.1 version.
For those wanting to downgrade from Windows 10 to Windows 7/8.1, it’s a surprisingly straightforward process. Unfortunately there’s no automatic system for older versions — you’ll have to backup your files, track down some installation media, and find your software key to get back to your “old” computer.
Please note that the option to downgrade is only available on computers that have been upgraded to Windows 10 from a Windows 7, 8 or 8.1 operating system. As a result, this option will not be available on your computer if:
- The computer was bought with Windows 10 pre-installed.
- The hard drive of the computer was formatted before Windows 10 was installed. This is also known as a Clean Installation.
Table Of Contents
Finding the option to downgrade Windows 10
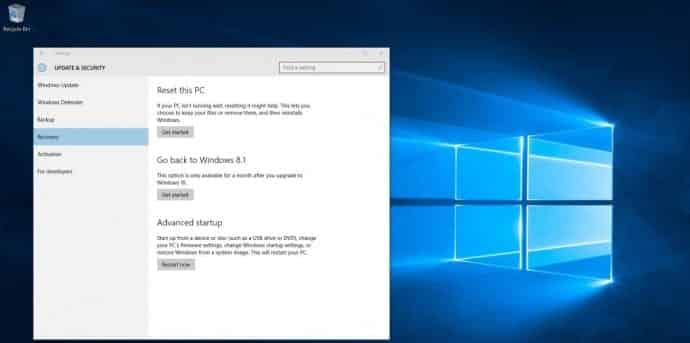
The option to downgrade Windows 10 is found in the new Windows 10 Settings page.
1. Open the Start menu and click ‘Settings’
2. In the Settings window, scroll down a bit and click ‘Update and Security’
3. In the Update and Security section, select ‘Recovery’ on the left
If there is an option to the right of the window that reads “Go back to Windows 7”, “Go back to Windows 8” or “Go back to Windows 8.1”, then you can downgrade Windows 10 and rollback to your previous operating systems without any hassle. You can click here to move ahead and get started.
Please note that this option will not appear if you are logged into a guest account or a standard account. You must be logged in as an administrator to view this option.
Verifying your Windows account type
1. Open the Start menu and click the “account” field found at the top of the menu. The account field will show the name and picture of the account currently in use.
2. In the small drop-down menu under the “account” field, click the option ‘Change account settings’
The account section of Settings will open.
Information on the currently logged-in account will be displayed on the right of the window. If the word ‘Administrator’ is not found below the name of the account, then you are not logged into an Administrator account. Try logging into an administrator account and try again.
Downgrading your Windows 10 operating system
Before downgrading your system
Before downgrading Windows 10, make sure you follow the following steps to ensure a smooth change in operating systems:
- Backup your important files. These will include your documents, pictures, music and videos. There is a possibility that some of your files can be deleted or corrupted during the process. You can backup your files on USB storage devices, optical recordable discs (DVD-R, DVD-RW, CD-R and CD-RW), external hard drives, or cloud storage (such as Dropbox, Google Drive and OneDrive).
- Retrieve all installation files and installation CDs or DVDs for all programs installed on Windows 10. After a downgrade, all programs installed on your computer while it was running the Windows 10 operating system will disappear.
- If you are downgrading Windows 10 on a laptop or netbook, ensure that the battery is full and can provide more than three hours of uptime. For convenience, connect the AC power adapter.
After these three steps, it’s time to begin.
Starting the downgrade process
Now that you are all set to downgrade Windows 10, it’s time to begin.
1. Go to the Recovery tab in the Update and Security section of Windows 10 Settings.Click here to review how to find it.
2. Under the heading “Go back to Windows 7’ or “Go back to Windows 8” or “Go back to Windows 8.1”, click the “Get Started” button.
3. You will be asked to give reasons for choosing to downgrade Windows 10. It is mandatory in order to proceed, so select one of the given reasons or type your own reason in the space provided. Click ‘Next’ to continue.
4. If there are uninstalled updates, you will be given the option to install the latest updates instead of downgrading Windows 10. Select ‘No, thanks” and proceed.
5. You will be reminded about information that we would have covered. Click “Next” to continue.
6. You would be reminded that you need to remember the password for your accounts in the previous Windows 7 or 8. Click ‘Next’ to continue.
7. At last, the final message! You will be thanked for using Windows 10 and invited to use it in the future. Click ‘Go back to Windows 7’, ‘Go back to Windows 8’, or ‘Go back to Windows 8.1’ to proceed.
Congratulations! Your computer will restart and begin downgrading Windows 10 back to your Windows 7 or Windows 8 operating system.
Also read: How To Find Windows 10 Product Key And How To Activate It

