
Roblox is a gaming platform that allows users to create games and share them to play with other users.
While Roblox is one of the trendiest games that rose to vogue recently, its virtual setup impresses users the most!
You would use your gaming skills to win the game or defeat your opponent in Roblox games.
When you have excellent gaming skills, you like to share them on your social media, YouTube channel, or similar.
Further, you would often share it with your friends or squad.
Voice-over, expressing your gameplay, requires recording sounds.
If you are wondering how to record Roblox with voice, then we have covered you all!
Table Of Contents
1. What Do You Need to Record Roblox?
Now that you have decided to record Roblox, you should know what you need.
Below-mentioned is a list of the same:
- A device for gameplay
- Roblox app or software
- Internet Connection
- Microphone
- Speakers
After knowing the requirements, you can set up your microphone.
2. How to Set up Your Microphone?
If you use a wired microphone, connect it to your PC in the appropriate port. However, if you use a Bluetooth-enabled microphone, you will need to add one.
- Go to Windows Settings > Bluetooth & Devices, and click Add Device.
- When you notice your Microphone in the list, click to add it.
- Once the pairing is complete, go to System > Sound > Input
- Set your Microphone as default, and set the volume at 100.
Your Microphone is now ready to use. This section will tell if the Microphone is working as expected. You can go to Headset properties and run a Test to check if everything is ok.
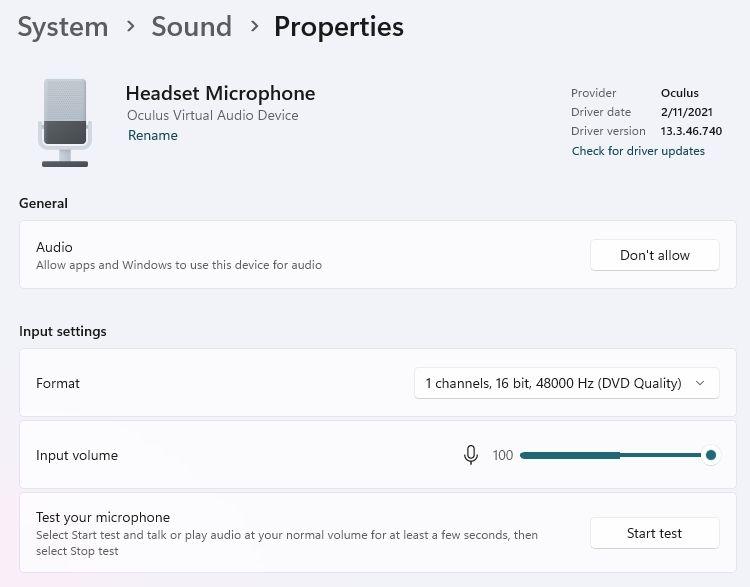
Test your Microphone Select an Image
If your Microphone is not accessible in the app, go to Privacy settings and ensure it’s not blocked for that app.
3. The Best Way to Record Roblox
How about recording Roblox videos with sound and your voice? It would be great if you could set up a microphone on Roblox using an alternative method.
It seems excellent, and EaseUS RecExperts lets you do so quickly. It would be best to capture only some of the screen; the tool allows you to record selected portions. Further, you can record your videos, enabling you to set up a mic so that you can also record your voice.
The best part is that audio and video quality will be top-notch using the EaseUS RecExperts. It is available to download on Windows and Mac devices. Besides, you can save the recordings in your preferred format. You not only have a microphone, but you can also set up a Webcam to record your videos.
Follow the steps given below to record Roblox using EaseUS RecExperts:
Step 1: Head over to the part of the game where you want to record
Step 2: Start EaseUS RecExperts and set Game Mode
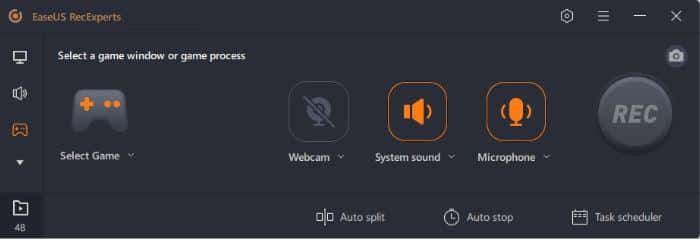
Set Game Mode in EaseUS RecExperts Select an Image
Step 3: Tap on the console from the left pane, navigate to Video, and set the recording quality, format, and more.
Step 4: Press the OK button to save changes
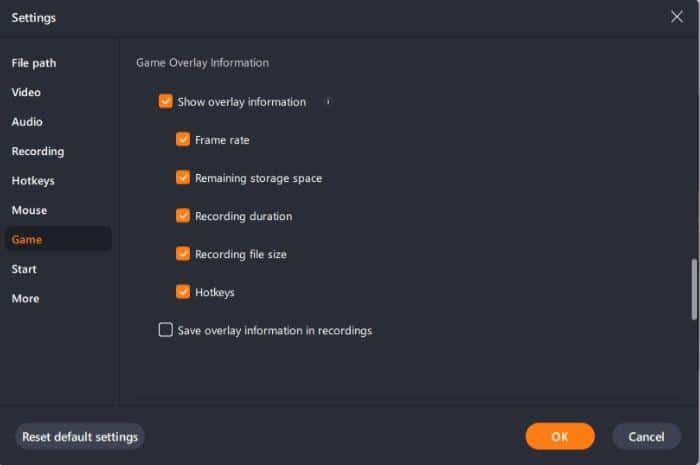
Save Overlay Settings Select an Image
Step 5: Now, click on the Select Game label and choose a game that you want to record

Select the game you want to record Select an Image
Step 6: Press the OK button and tap on REC, to begin with the Roblox recording.
The good part is that using the EaseUS tool can also schedule the recording on Roblox. It gives it a more advanced edge over others.
4. How to Improve Your Recording Quality?
The inbuilt Roblox recorder does not record videos in high quality. Hence, it’s the default recording quality average. So if you want to improve your recording quality, you need a third-party recorder. Moreover, you don’t need software but a reliable and efficient Roblox video recorder that meets all your recording prerequisites.
One of the most efficient tools is EaseUS RecExperts for Windows and Mac, and it has advanced features for improving the quality. Further, it lets you select the part you want to record instead of recording the entire screen mandatorily.
5.Tips for Avoiding Feedback and Other Sound Problems
You might be in a situation where you would have sound-related problems in Roblox recordings.
We have some helpful tips for avoiding feedback and other sound-related problems:
- Use a Good Quality Microphone: Your mic should be of good quality for better voice recording. Ensure that it has an efficient Active Noise Cancellation feature.
- Better Quality Headphones/Speakers: To hear the sound correctly, it is essential to use better quality headphones/speakers. If you have an external speaker, try using an equipped ANC.
- High-Speed Internet Connection: Apart from having an internet connection, it is necessary to have an active and high-speed internet connection. For it, preferably use WiFi.
- Record in Minimal Disturbances: You would still not use microphones or speakers with Active Noise Cancelation. But make sure you record in places where disturbances are minimal. No one speaks in between, and neither are necessary sounds to ensure better input and output.
- Have a Loud and Clear Voice: While you set up a mic for recording sound, you must be loud enough for the sound to record correctly. It is also essential that you have voice clarity. For it, do not eat or chew or do any such thing while you are speaking to record.
- Use Powerful Software: While Roblox’s built-in recorder lets you record game sounds, you cannot record your voice. Therefore, you use software to cope with the same. It is essential to ensure that the software you use is OK with the sound and similar problems.
Following the tips above, you can record Roblox excellently with perfect sounds.
The Final Word
You must have become familiar with how you can record Roblox with voice. The built-in recorder records the gameplay and its sounds but does not let you record voice amidst that.
The best method we recommend is using powerful software like the EaseUS RecExperts for Windows and Mac.
It is better because it records in high quality, unlike an inbuilt Roblox recorder!
You can capture it to your desired formats, record voices, and even enable a webcam.
Moreover, you can even scale your recordings before capturing them. Some tips include recording with minimal disturbances, using microphones with active noise cancelation, and similar measures to value sound-related problems.
