
Wondering how to fix System interrupts high CPU usage on your computer?
System interrupts is a system-level process on Windows OS responsible for handling hardware interrupts. While it’s not a process that can be interacted with, it is very important for the smooth functioning of a PC.
This process comes up when the system requires your CPU to perform a high-priority task, mostly associated with hardware requests. The ongoing CPU task is, as a result, interrupted to accommodate urgent hardware-related tasks such as keyboard and mouse requests.
In essence, when you spot “System interrupts” in your Windows Task Manager, it’s crucial to understand that it’s merely a Windows process and not malware.
However, Windows PCs sometimes come up with high CPU usage as a result of the “System interrupts” process. This has also been reported by several users in several forums and communities.
If you encounter this issue, fret not, as it can generally be resolved using various Windows troubleshooting methods, which I will explore in detail in this article. Keep reading for the solutions.
Table Of Contents
- Why is system interrupts using so much CPU?
- How to Fix System Interrupts High CPU Usage
- 1. Disconnect Connected Peripherals
- 2. Run the SFC and DISM Scan
- 3. Update Hardware Drivers
- 4. Disable Antivirus App
- 5. Update BIOS
- 6. Check for Hardware Failure
- 7. Update Windows
- 8. Disable And Enable Hardware
- 9. Perform a clean boot
- 10. Clean Install Windows
- Can a virus cause high CPU usage?
- How much CPU usage is normal?
- Wrap Up
Why is system interrupts using so much CPU?
It may be hard to identify the exact cause of the “System interrupts high CPU usage” on your computer, given that the process itself is not inherently problematic.
Instead, the problem may lie in malfunctioning hardware sending an excessive number of requests for processing. In such instances, the System Interrupt process comes into play to alert the CPU of the task, resulting in elevated utilization due to the substantial volume of requests.
Other major factors that result in this issue include:
- Hardware fault
- Corrupt Operating System
- Malware effect
- Outdated or corrupt driver
- Conflicting processes
Hence, the System interrupt high CPI usage is indicative of a problem on your computer and should be addressed accordingly.
How to Fix System Interrupts High CPU Usage
System interrupts high CPU usage can be an issue that leads to sluggish PC performance or even crashes, especially on less powerful CPUs. Hence, it is imperative to fix it as soon as it is noticed. As initial actions, consider freeing up storage space on your computer, running a malware scan, and restarting the PC. If the problem persists, perform the solutions below:
1. Disconnect Connected Peripherals
This issue, which is mainly attributed to hardware connected to your computer, can often be addressed by disconnecting peripherals. Open the Task Manager to watch the System interrupts CPU usage, unplug each peripheral one by one, and observe if any of them resolves the System Interrupts high CPU usage when disconnected.
2. Run the SFC and DISM Scan
To eliminate the chance that this problem stems from a corrupt or missing system file on your computer, it is advisable to perform an SFC and DISM scan. This will help repair the system and restore your computer to its optimal condition. Here are the steps to follow:
- Press Windows + S on your computer to open Windows Search, type cmd, and select Run as administrator on the right pane of the search result.
- On the Command Prompt window, type the following commands one by one and hit Enter after typing each of them to run the DISM scan:
DISM /Online /Cleanup-Image /CheckHealth
DISM /Online /Cleanup-Image /ScanHealth
DISM /Online /Cleanup-Image /RestoreHealth
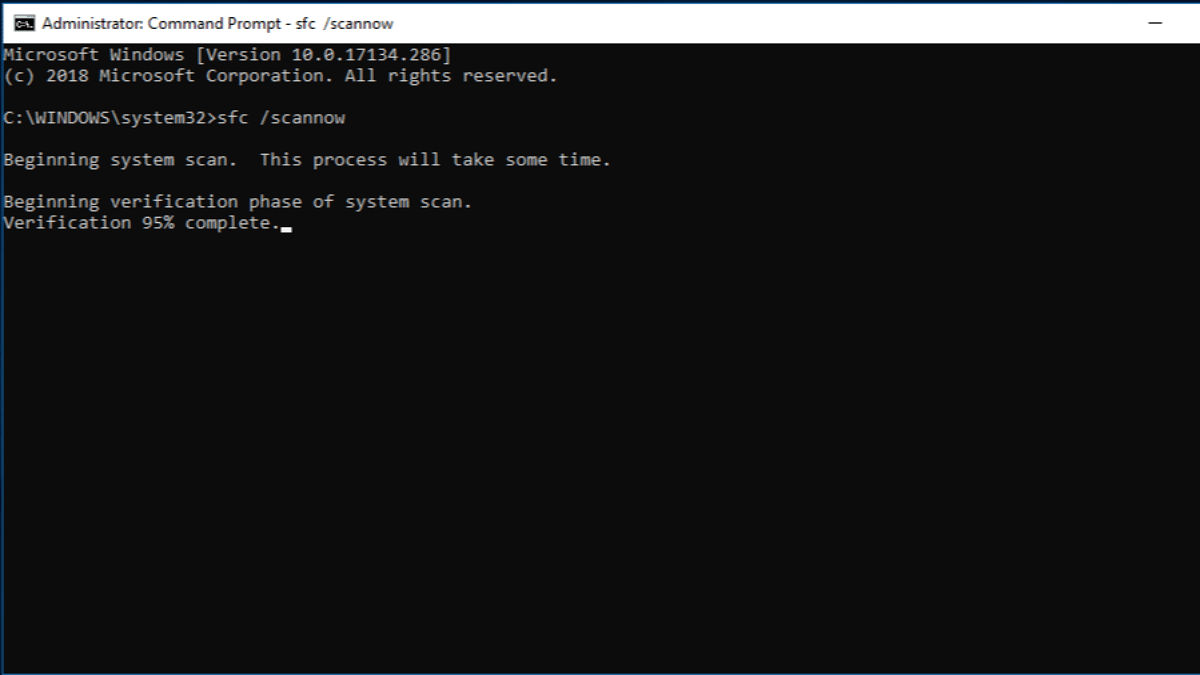
- To run the SFC scan, type the command below and hit Enter:
sfc /scannow
Afterward, you should restart your computer and see if the solution helps.
3. Update Hardware Drivers
The presence of missing or corrupted drivers on your computer might be the cause of the issue you’re experiencing. Consequently, you might need to install updated hardware drivers to resolve it. This encompasses the display driver, network driver, mouse driver, and audio driver.
While Windows Update is now capable of updating drivers, it might be more effective for you to install the updated drivers to address this issue personally. Here are the steps to guide you through the process:
1. Press Windows + X and select Device Manager.
2. Double-click the Display adapters option on the Device Manager window and note the display driver you are having on your computer
3. Go to the display driver’s website and download an updated version of the driver.
4. Now, go back to Device Manager and right-click your display driver.
5. On the resulting drop-down menu, tap on the Update driver option.
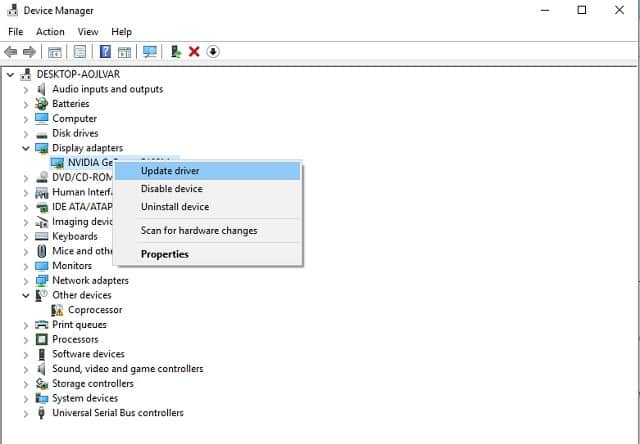
6. Select Browse my computer for drivers and follow other on-screen prompts to select the driver package you downloaded earlier.
Perform this action for every hardware driver on your computer until you observe that the high CPU issue has been resolved.
4. Disable Antivirus App
Certainly, antivirus applications play a crucial role in safeguarding PCs from malware threats. Nevertheless, at times, these applications may go beyond their necessary functions, potentially causing the issue of high CPU usage to be attributed to system interrupts.
As a solution, we suggest temporarily disabling your antivirus app, if you have one installed, and observing whether this action helps regulate the CPU usage attributed to System Interrupts in the Task Manager.
5. Update BIOS
Updating the BIOS facilitates smooth operation between the system and connected hardware, potentially resolving hardware-related issues like in this case. Nevertheless, it is a delicate procedure, and any mistakes during the update can result in significant complications for your computer.
To update the BIOS, download the appropriate update for your motherboard model from your PC manufacturer and install it. Refer to the manual available on your PC manufacturer’s site for guidance.
Before proceeding, identify your motherboard details. Here’s how:
1. Press Windows + S to open the Window Search.
2. Type msinfo in the search box and open the System Information result.
3. On the System Information page, navigate to the Baseboard Manufacturer and Baseboard Product and take note of the values.
This information can then be used to find the BIOS update for your computer and subsequently fix the issue.
6. Check for Hardware Failure
Now, another solution that can steer you towards getting this issue fixed is checking for hardware failure on your computer and fixing it accordingly. You can start by running the Memory Diagnostic Tool to identify any problems with your RAM. Subsequently, use Resource Monitoring tools like HWiNFO to assess the performance of other hardware components on your computer.
7. Update Windows
Should the problem persist and there are pending Windows updates on your PC, it is advisable to proceed with updating Windows. To accomplish this:
1. Press Windows + I to open Settings on your Windows 10 computer.
2. On the Settings window, tap Update & Security and select Windows Update.

3. Click on Check for Updates, and if there is any update available, tap Download and install to start the update process.
8. Disable And Enable Hardware
You have the option to deactivate hardware through the Device Manager and observe how the CPU usage for System Interrupts responds. Subsequently, re-enable the hardware to see its impact. Here is how to disable hardware on Windows a PC:
1. Press Windows + X to open the Start menu.
2. Select Device Manager from the menu.
3. On the Device Manager window, navigate to Display adapter or any other main hardware driver and double-click it.
4. From the drop-down menu, you should see the Graphics device on your computer.
5. Right-click the device and select Disable device.
6. Go to the Task Manager and see how the “System interrupts” process responds.
7. If the action makes no change to the process’s CPU usage, go back to the device manager, right-click the disabled device, and select Enable device.
8. On the other hand, if disabling the device fixes the high CPU usage, then there may be an issue with the device.
9. Perform a clean boot
Performing a clean boot might also assist in resolving the problem, and the steps to accomplish this are as follows:
1. Press Windows + R to open the Run dialog box.
2. Type msconfig in the box and hit Enter.
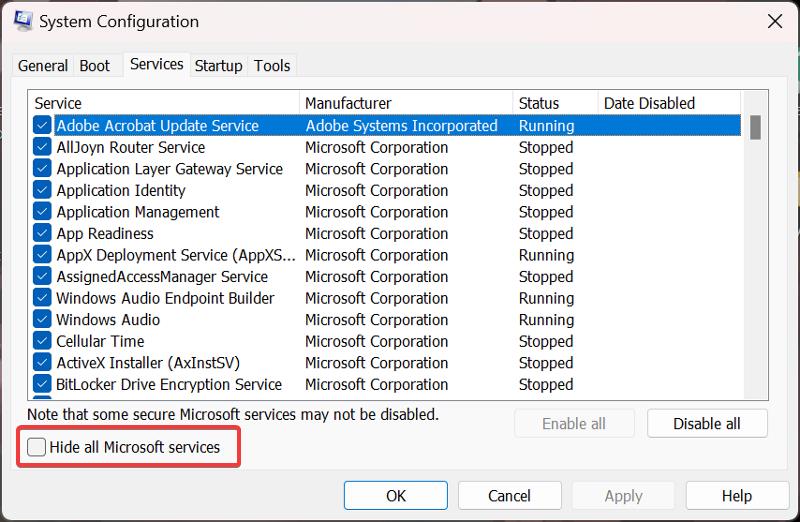
3. On the System Configuration window, go to the Services tab.
4. Check the Hide all Microsoft services box and then select Disable all.
5. Now, go to the Startup tab and select Open Task Manager.
6. Under Startup in Windows Task Manager, right-click each process and select Disable.
7. Next, close the Task Manager windows and select OK on the System Configuration windows to save the changes.
Afterward, you will receive a prompt to restart your computer. Upon restarting, your PC will initiate in a clean boot environment. If the problem is resolved in this environment, it suggests that one of the disabled services or processes might be the root cause of the issue.
10. Clean Install Windows
If the problem persists, consider performing a clean installation of the Windows operating system on your computer. This has proven helpful for some users experiencing similar issues and may provide a resolution for you as well. Keep in mind that a clean Windows installation will erase all your data, so make sure to back up your files before proceeding.
Related: How To Fix High CPU Usage and RAM Leakage in Windows 10 PC
Can a virus cause high CPU usage?
Yes, a computer virus can significantly increase CPU usage by triggering unusual processes, putting excessive strain on your CPU. That’s why it is crucial to conduct a malware scan if you notice unexpectedly high CPU usage on your PC.
How much CPU usage is normal?
Assigning a specific number to what qualifies as normal CPU usage on a PC is not feasible, given variations in CPU capacity and running processes power. Nevertheless, experiencing close to 100% CPU usage with non-intensive programs on an efficient CPU may signal an abnormality.
Wrap Up
If the CPU usage of the System interrupts process remains manageable, there’s no need for concern, as it’s an essential process for your computer. Besides, it will quit as soon as it finishes its function. However, the solutions outlined in this article can assist you in resolving the issue if the CPU usage is too high.
