
Windows PCs are known to face “no sound issues”. The major cause is buggy updates by Microsoft that several times have left windows 11 users with no audio on their PC.
The issue is not only limited to internal speakers but external speakers, and headphones as well.
While there are several reasons why your windows 11 PC or laptop suddenly has no sound. The major reason can be a faulty windows update, a broken driver, audio software, or sound card issue.
The same issue was also often faced by Windows 10 users where the issue said No audio output device was installed.
Here in this article, we have compiled several methods to fix no the sound issue on Windows 11.
Table Of Contents
- How to Fix No Sound On Windows 11 (2022)
- 1. Check if Audio is Muted or Volume is Low
- 2. Connect Audio Cable to Correct Port
- 3. Choose the Correct Audio Output Device
- 4. Enable Playback Device
- 5. Adjust Sound Settings
- 6. Troubleshoot Audio Devices
- 7. Update Audio Drivers
- 8. Restart Windows Audio Service
- 9. Check If Bluetooth Dongle Is Working Properly
- Conclusion
How to Fix No Sound On Windows 11 (2022)
This tutorial contains 8 different methods to fix the No Sound issue on Windows 11, while some of them are fairly simple, others might take a bit more of your time.
But since we have explained every method in detail you will not face any difficulty or confusion getting sound back on a windows 11 PC.
We will start with simple fixes and then move on to the major fixes later in this article.
1. Check if Audio is Muted or Volume is Low
Often times you may not realise that you have muted speakers or that the volume is so low that it is inaudible.
This is something that happens to everyone, and while this may not be the reason for no sound on Windows 11, there is no harm in checking it once.
To check if your audio is muted or the volume is low, follow these steps:
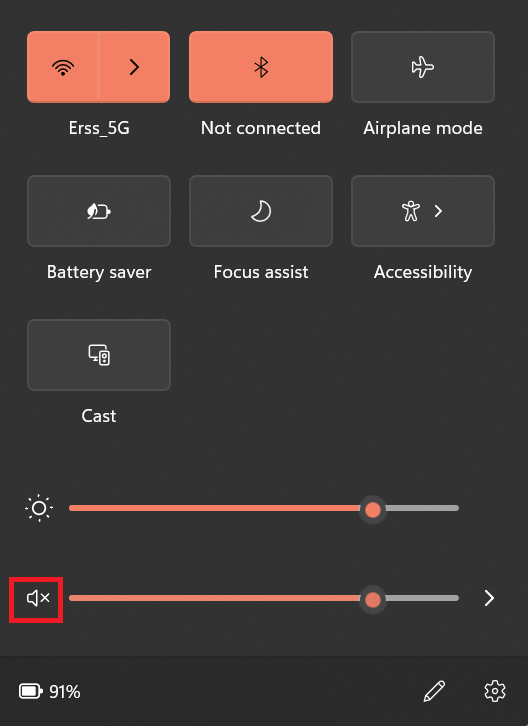
- Click on ”Windows + A” to open the Windows Action Panel. Here, check that your audio is not muted. If it is, simply click on the volume button to unmute it.

- Also, check the volume bar to make sure that the volume is not low. If it is, simply drag the slider to the desired volume level.
2. Connect Audio Cable to Correct Port
If you have a desktop, you may have connected your audio cable to the wrong port which may be the reason for no sound issue on Windows 11.
The audio port is the green-colored port behind the CPU.
If your audio cable is connected to a different port, disconnect it and connect it to the green-colored port.
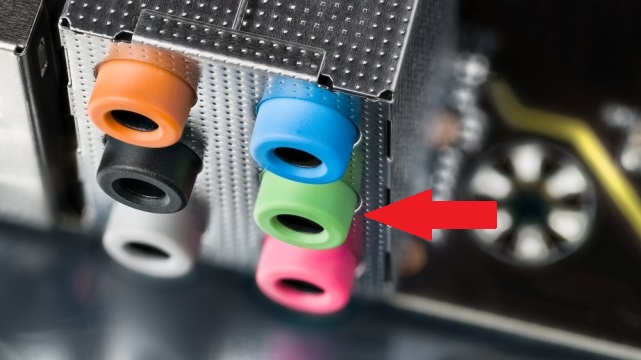
On the output end, make sure you connect the cable to the 3.5mm jack marked with a headphone label and not the microphone label.
After connecting the cable to the headphone jack, follow the steps below to choose the correct audio output device.
3. Choose the Correct Audio Output Device
One of the most common reasons for the no sound issue on Windows 11 is choosing the wrong audio output device.
You need to use the Action Panel to select the correct audio output device which might fix the issue.
- Click on ”Windows + A” to open the Windows 11 Action Panel.
- Now, click on the arrow next to the volume slider.
- Here, select the device you want to use for Audio Output.


This might fix the no sound issue on Windows 11, if there is still no sound output try restarting your device after switching the audio output device.
4. Enable Playback Device
A Windows 11 bug may disable a playback device on your computer. Incase this happens, you’ll need to manually enable the playback device using the control centre.
To manually enable a playback device on Windows 11, follow these steps:
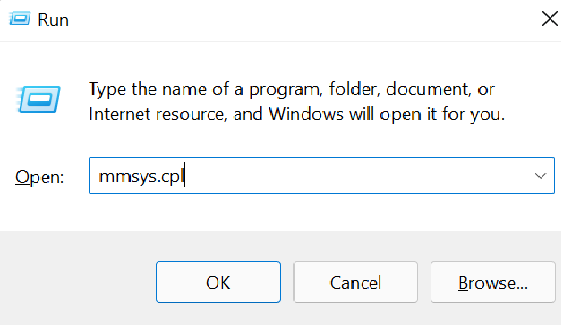
- Open ”Run” using ”Windows + R” or by clicking on the ”Windows” button and searching for ”Run”.
- In the text box, type ”mmsys.cpl” and press Enter.

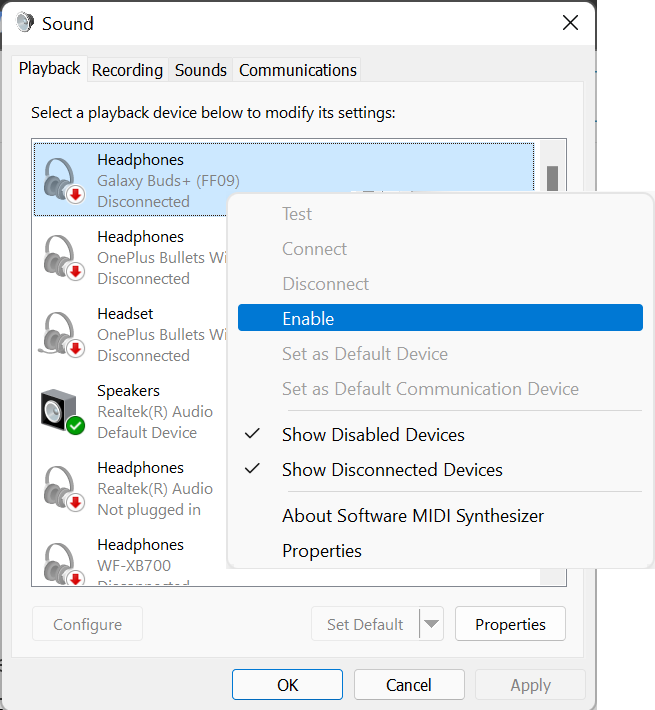
- Now, search for your audio device under the “playback” tab.
- After finding your preferred audio device, right-click on it and click on enable.

- You can also test the device by right-clicking on it and clicking on ”Test”.
If there is no audio output, try enabling and testing other playback devices till you find the right one.
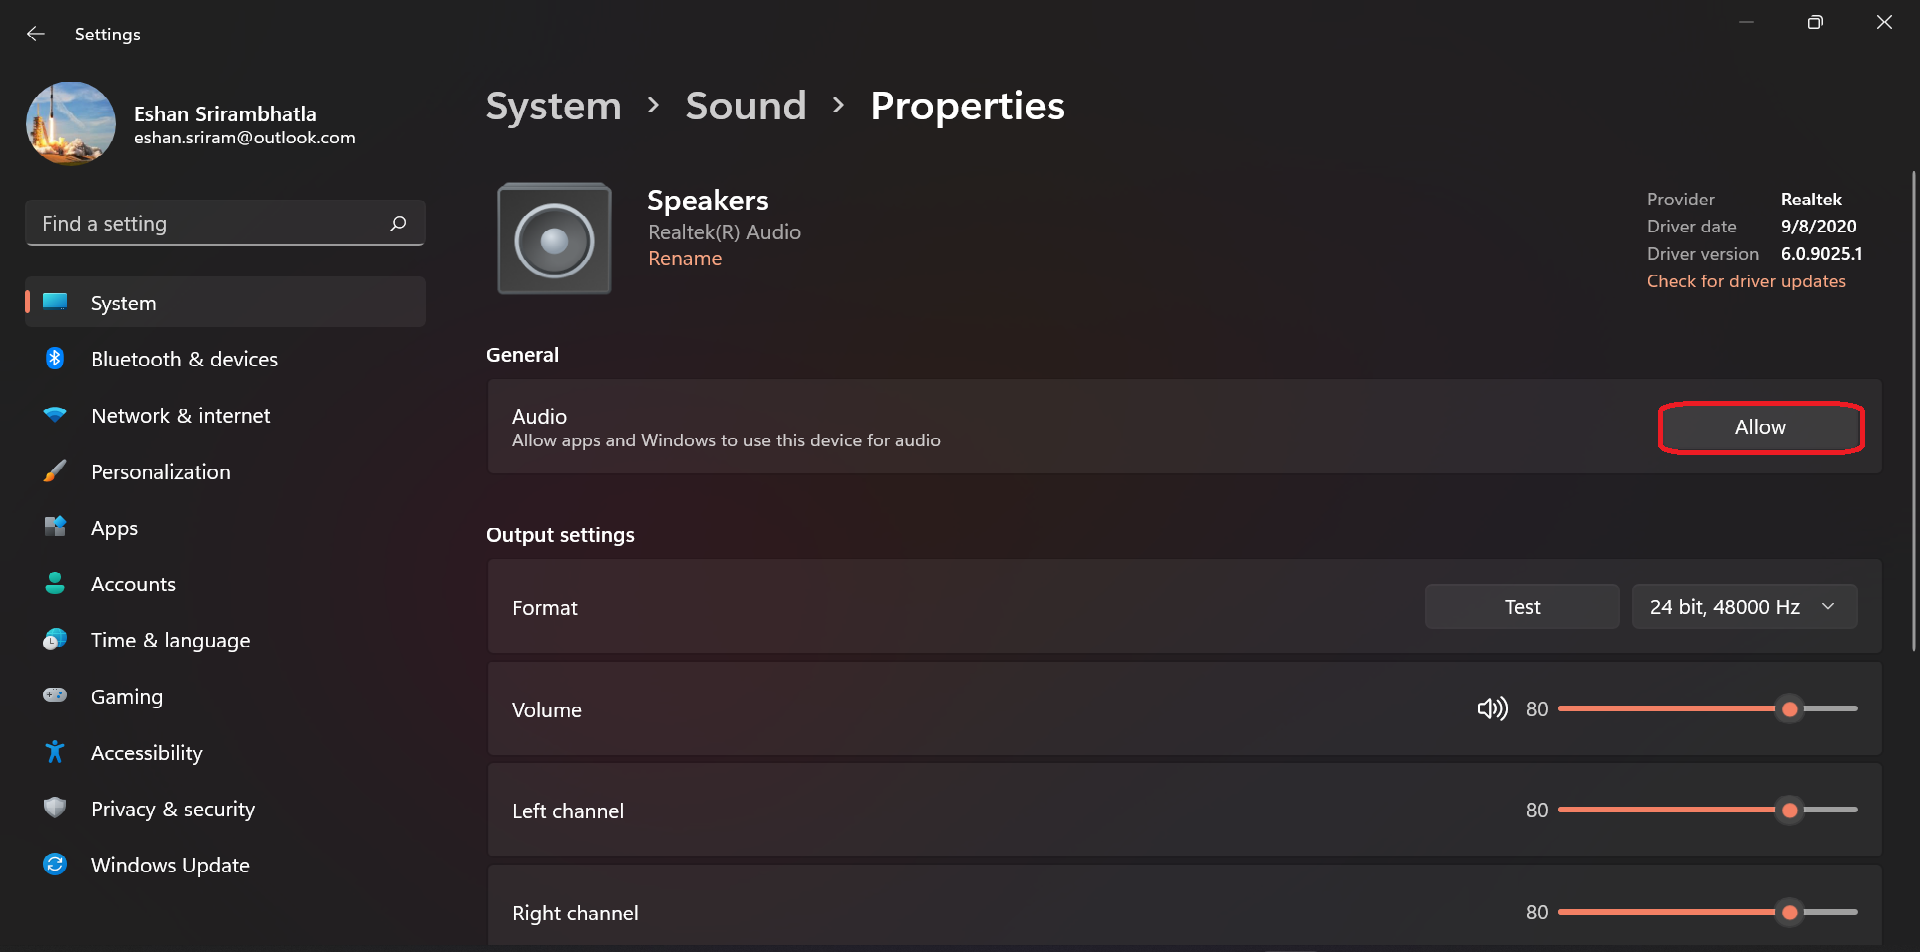
5. Adjust Sound Settings
Adjusting sound settings might also fix the no sound issue on Windows 11. Follow these steps to adjust different settings that have been known to cause the no sound issue on Windows 11:
- Open settings, and search for sound settings.
- Select the audio device for which you want to adjust settings and click on the arrow next to it.
- Next, under the ”General” section check if you are able to see an allow button. If you do, click it to enable apps to use this device for audio output.

- Now, scroll down and disable ”Enhanced Audio”. This feature has been known to cause the no sound issue on Windows 11.
- Scroll a bit further and disable ”Spatial Audio” from the drop-down menu. Like “Enhanced Audio”, ”Spatial Audio” has also been known to cause the no sound issue on Windows 11.
Now restart your PC, if the issue is still not fixed try other methods given below.
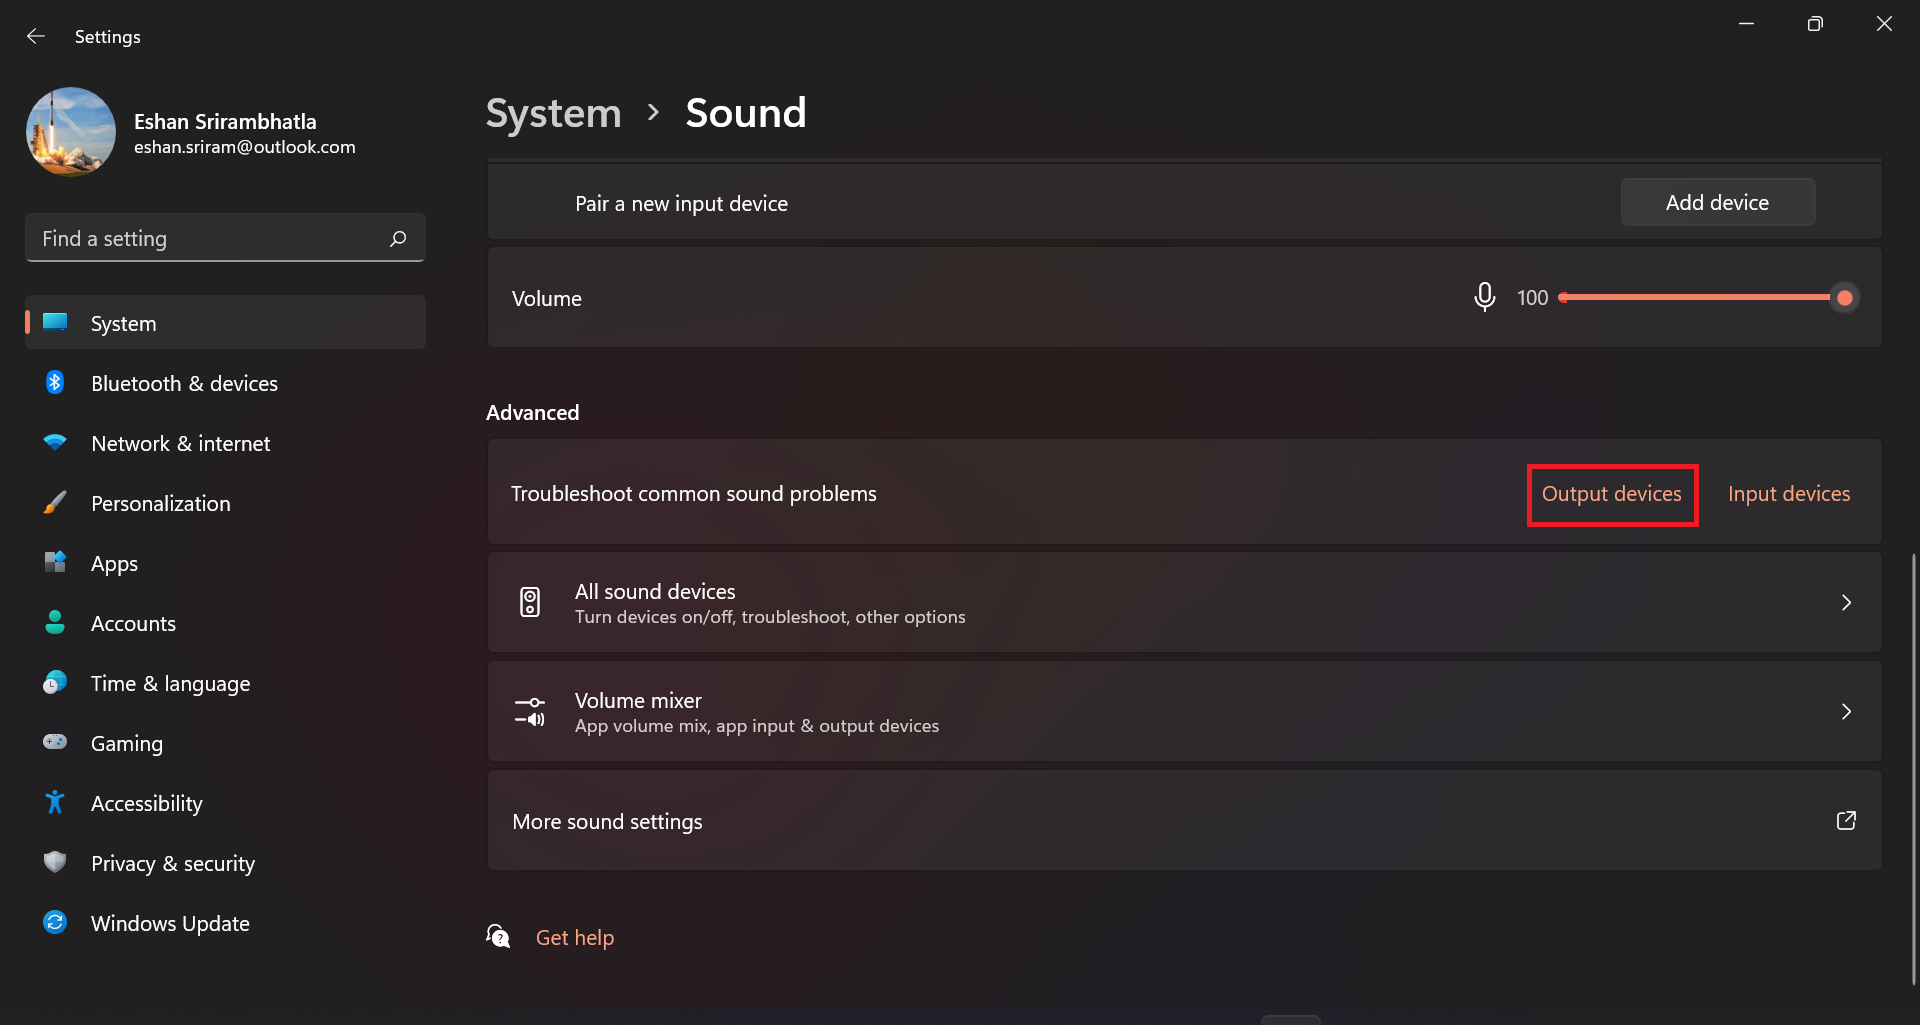
6. Troubleshoot Audio Devices
Sometimes, we have to turn to the in-built troubleshooter in Windows 11 which might just be able to detect the problem and fix it or atleast direct you on how to fix it.
To use the Windows 11 troubleshooter, follow these steps:
- Open Settings, and search for sound settings.
- Scroll down to the “Advanced” section and click on ”Output Devices” next to “Troubleshoot Common Sound Problems”.

- Windows 11 will now try to detect and fix the problems with your Output devices.
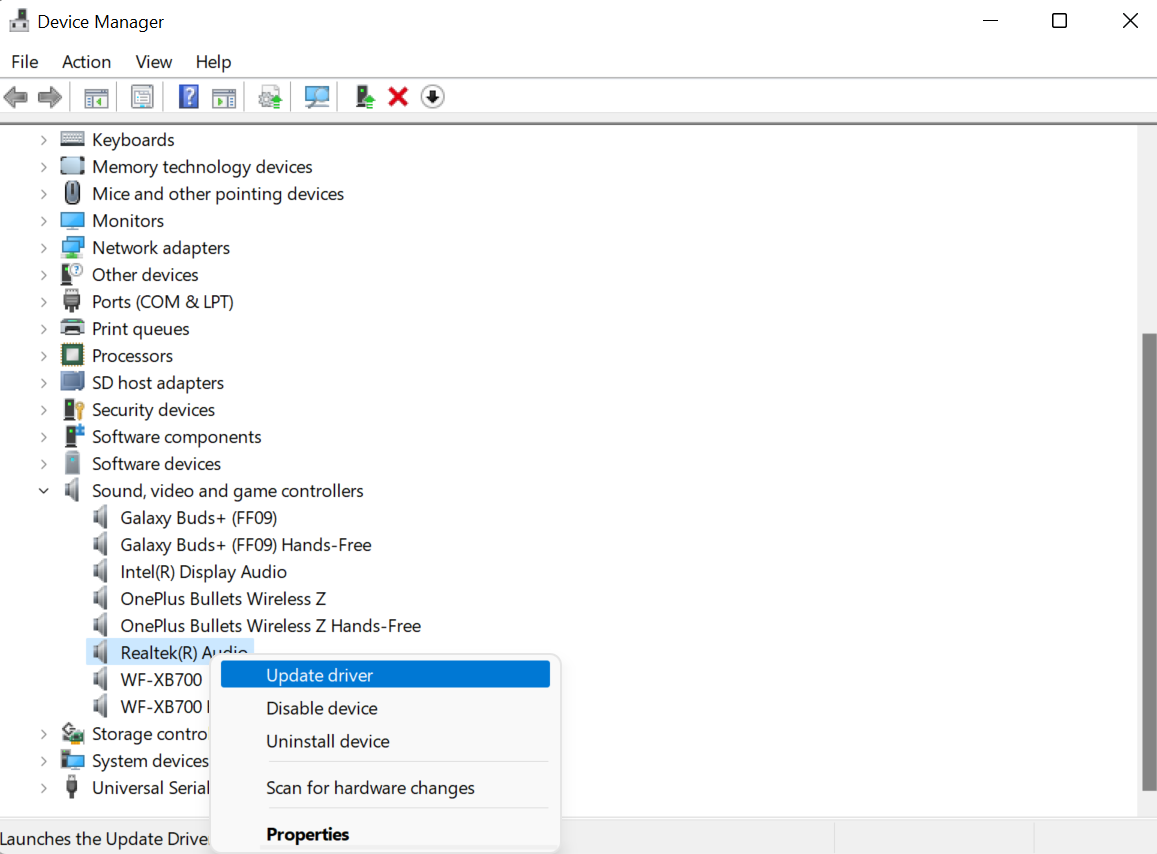
7. Update Audio Drivers
Now, we’re coming to the methods that might take a bit of time. But since none of the other methods worked, you’ll have to reinstall your audio drivers.
To Update audio drivers follow these steps:
- Click on the Windows button and search for “Device Manager”.
- Double-click on the first option to open it.
- Now, scroll down to find “Sound, video and game controllers” and expand it by clicking on the arrow next to it.
- Find the audio driver your computer uses, for example,”Realtek High Definition Driver”, right-click it, and click on ”Update Driver”.

- Now, select ”Search automatically for drivers”, Windows should now automatically find and install the latest audio driver.
- Restart your PC and the sound issue on Windows 11 should now be fixed.
- If Windows is unable to find and install the latest drivers, try to use third-party software such as IOBIT Driver Booster to automatically update your audio drivers.
8. Restart Windows Audio Service
If all else fails, you need to try restarting Windows Audio Service. This service handles everything audio-related on Windows 11 and should fix the no-sound issue. To restart Windows Audio Service, follow these steps:
- Use Windows Search or click on ”Windows + R” to open Run.
- In the text box, type “services.msc” and press Enter.

- Now, scroll down to find ” Windows Audio”. Once you find it, double click on it to open its properties.
- Here, set startup type to ”Automatic” using the drop-down menu.
- Now, click on ”Stop” and then click on Apply.
- Then, click on “Start” and again click on Apply.

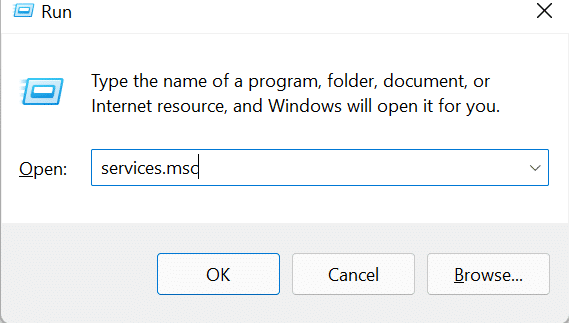
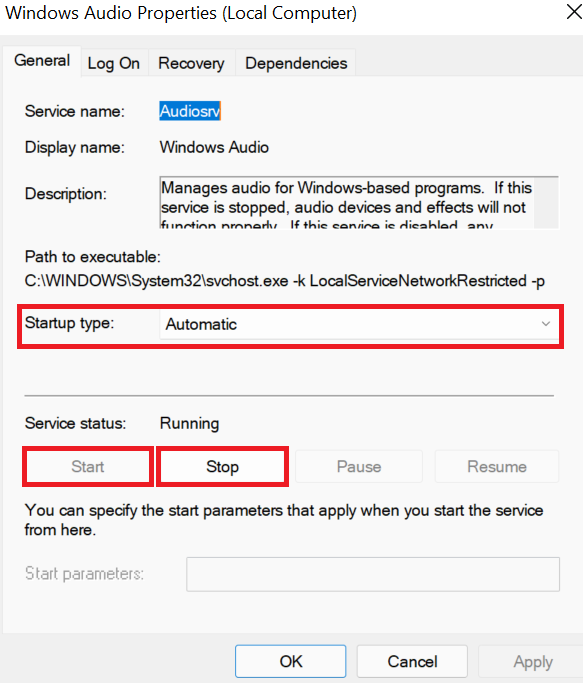
Restart your PC and sound should now be working fine on Windows 11
9. Check If Bluetooth Dongle Is Working Properly
If you are connected to an external speaker using Bluetooth connectivity such as a dongle then check if the dongle is inserted properly and is working fine.
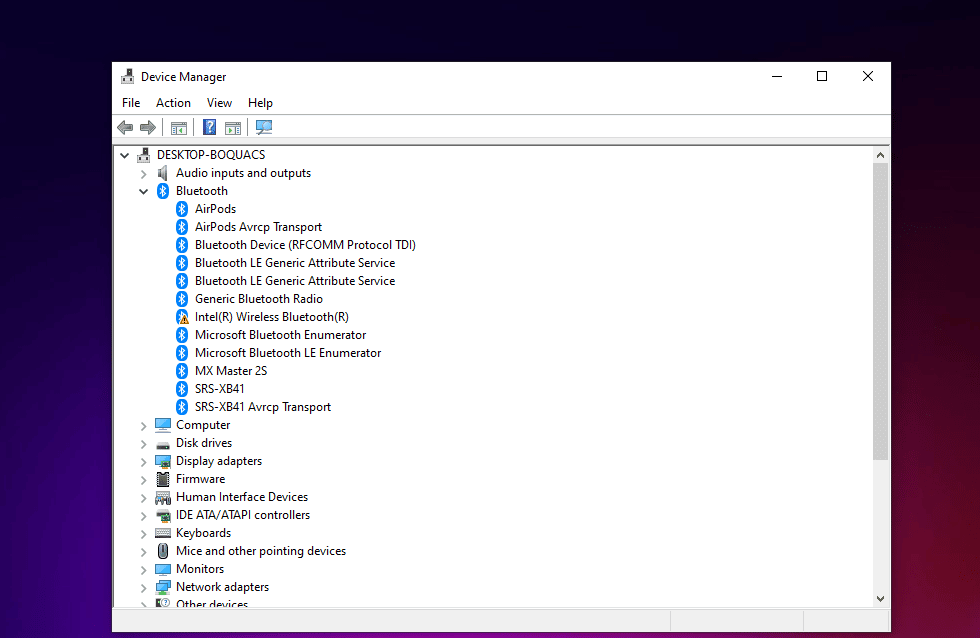
Sometimes new drivers or windows updates can cause conflict with Bluetooth audio drivers such as Intel(R) Wireless Bluetooth(R), or Generic Bluetooth Radio. You can try reinstalling it or rolling back to an older version.
Conclusion
These are the 9 methods you can use to fix the No Sound Issue on Windows 11. If none of these methods worked, it might be a hardware defect you’ll need to take your computer to a service center.
