

WordPad is missing on many Windows 11 PCs after the 24H2 update. Microsoft removed the classic rich-text editor, and there is no official standalone download available.
If you recently bought a new laptop or updated Windows, you may have searched the Start menu for WordPad and found nothing. Version 25H2 and the 26H2 update, which started rolling out on September 29, 2026, don’t bring it back either.
The good news is that the original app can still work on newer Windows 11 builds. You just need to put its files back. This is an unofficial workaround, so it may not work on every PC.
This guide shows you how to download and install WordPad on Windows 11 in 2026, step by step. We’ll also cover how to add it to the Start menu, make it open RTF files again, fix common errors, and decide when a modern alternative makes more sense.
Check Your Windows 11 Version First
Before you start, check which version of Windows you’re using:
- Press Windows + R.
- Type winver and press Enter.
- Check the version number in the About Windows window.
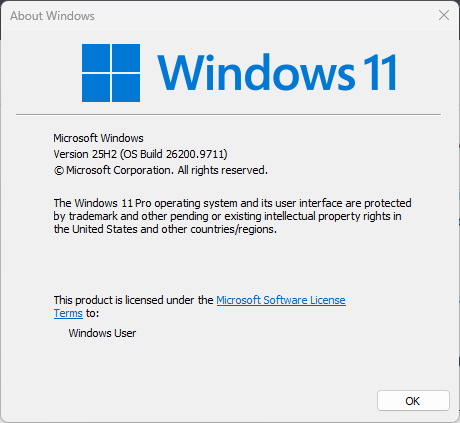
If you’re on Windows 11 23H2 or earlier, search for WordPad in Start first. It may still be installed. On 24H2 and later, continue with the methods below.
You can also find your version under Settings > System > About > Windows specifications.
Is There an Official WordPad Download for Windows 11?
No. Microsoft doesn’t provide a standalone installer for the removed app. A Microsoft Store listing with a similar name isn’t necessarily the original WordPad.
The removal applies to all Windows 11 editions, including Home, Pro, and Enterprise. Microsoft’s notice lists three affected files: wordpad.exe, WordpadFilter.dll, and write.exe. You can read the details on Microsoft’s website.
You also can’t add WordPad through Optional Features on 24H2 or later. SFC and DISM won’t restore it, because it is no longer part of those Windows versions.
How to Download and Install WordPad on Windows 11
If you have an older Windows PC with WordPad still installed, start with Method 1. If you don’t, you may be able to recover the files from Windows.old, use a third-party installer, or extract them from an older Windows ISO.
Method 1: Copy WordPad Files from an Older Windows PC (Safest Method)
This is the cleanest option if you have access to a trusted Windows 10 computer or a Windows 11 PC still running 23H2 or earlier. You use the files already on that machine without downloading a separate installer.
On the older computer:
- Open File Explorer.
- Paste this path into the address bar and press Enter:
C:\Program Files\Windows NT\Accessories - Copy these items to a USB flash drive:
- wordpad.exe
- WordpadFilter.dll
- The language folder containing wordpad.exe.mui
For English (United States), the language folder is usually en-US. If the older PC uses another language, copy the folder that comes with that installation. Leave the MUI file inside it.
On your Windows 11 24H2 (or later) PC:
- Create a folder called WordPad in a permanent location, such as Documents.
- Paste the copied files into it, keeping the language folder and its contents together.
- Double-click wordpad.exe.
For a US English copy, your WordPad folder should contain:
- wordpad.exe
- WordpadFilter.dll
- An en-US folder with wordpad.exe.mui inside it.
Keep the first two files directly inside the WordPad folder. Leave wordpad.exe.mui inside en-US.
Take all the files from the same installation rather than mixing copies from different PCs. Where possible, use a source PC with the same system type as yours. You can check this under Settings > System > About.
Keep WordPad in its own folder. You don’t need to put it back inside a Windows-managed directory.
Method 2: Restore WordPad from the Windows.old Folder
If you recently upgraded from Windows 10 or Windows 11 23H2, your PC may still have a backup of the previous installation.
- Open File Explorer.
- Paste this path into the address bar:
C:\Windows.old\Program Files\Windows NT\Accessories - If the WordPad files are there, copy them into a permanent folder using the layout shown in Method 1.
- Open wordpad.exe from the new location.
Important: Windows normally removes the previous installation about 10 days after an upgrade. Storage cleanup may remove it sooner, so copy the files while they’re available. Microsoft explains the cleanup period here.
This only helps if the previous installation contained WordPad. A backup of a standard 24H2 or later installation won’t have it.
Method 3: Use a Third-Party Installer (Easiest Option)
If you don’t have the files, an installer can handle the copying and shortcut setup for you. One option is Winaero’s WordPad for Windows 11 package, available through Win7Games.
The publisher says it uses unmodified Microsoft files. Its version 2.0 installer also adds RTF registration and the New > Rich Text Document option in File Explorer. It installs the language files your PC needs.
- Visit the WordPad for Windows 11 section on Win7Games.
- Use the download link in that section.
- Scan the downloaded package with Microsoft Defender or your preferred antivirus.
- If it comes as a ZIP file, right-click it and choose Extract All.
- Run the installer, review any security prompts, and follow the setup instructions.
- Open WordPad from Start or its desktop shortcut.
This is a third-party download, not a Microsoft installer. A clean antivirus scan doesn’t guarantee safety, so check the source and don’t ignore security warnings.
The package adds shortcuts, but it may leave your current default RTF app unchanged. If documents still open elsewhere, follow the default-app section below.
Method 4: Extract Files from an Older Windows ISO (Advanced)
This method is useful if you already have a trusted Windows 10 ISO or a Windows 11 ISO from version 23H2 or earlier that includes WordPad. A current Windows 11 image won’t contain the removed app.
You’ll also need a recent version of the free 7-Zip app.
- Right-click the ISO file and choose Mount.
- Open the new virtual drive and go to the sources folder.
- Find install.wim or install.esd.
- Open it with 7-Zip File Manager.
- Browse the Windows image or edition folders. These may appear as numbered folders, depending on the image.
- Find
Program Files\Windows NT\Accessories. - Extract the WordPad files and language folder, keeping the layout shown in Method 1.
- Double-click wordpad.exe.
The image can take a while to open. If 7-Zip can’t read it or the required files aren’t there, use another method.
After restoring WordPad: Create a short test document, save it as RTF, close it, and open it again. This checks basic editing and saving before you use your existing documents.
How to Make WordPad Appear in Start Menu, Search, and Taskbar
If you copied the files manually, add a shortcut so you don’t have to open the WordPad folder each time. If your installer already created one, you can skip these steps.
Create a desktop shortcut:
- Right-click wordpad.exe.
- Select Show more options > Send to > Desktop (create shortcut).
Add WordPad to the Start menu:
- Press Windows + R, type shell:programs, and press Enter.
- Copy the shortcut into the folder that opens.
- Rename it WordPad.
- Find it in Start and right-click it to choose Pin to Start, if available.
To pin it to the taskbar, open WordPad, right-click its taskbar icon, and select Pin to taskbar.
Leave the application folder where it is. Moving it later can break the shortcuts.
Set WordPad as the Default App for RTF Files
- Right-click an .rtf file.
- Choose Open with > Choose another app.
- Select the option to choose an app on your PC.
- Browse to your WordPad folder and select wordpad.exe.
- Choose Always, or the equivalent option to keep using WordPad.
The button names may differ slightly between Windows builds. Choosing Just once won’t save your preference.
You can check the setting later under Settings > Apps > Default apps by searching for .rtf.
How to Uninstall WordPad Later
If you used the installer, open Settings > Apps > Installed apps, find WordPad, and choose Uninstall from its menu.
For a manual copy, close WordPad and choose another default app for RTF files. Then delete the application folder and its desktop and Start menu shortcuts.
Before deleting the folder, move out any documents you saved inside it.
WordPad Not Working on Windows 11? Try These Fixes
- WordPad won’t open: Make sure the files have been extracted from the ZIP. Compare your folder with the layout in Method 1, especially the language folder and wordpad.exe.mui.
- Missing DLL error: Read the file name in the message. If WordpadFilter.dll is missing, copy it again from your original source. Don’t try to fill the gap with a DLL from a separate download site.
- WordPad does not appear in Search: Open its Start menu shortcut directly. If that works, give Search time to update or sign out and back in.
- RTF files still open in another app: Check the default-app setting described above. Also make sure you selected the restored executable rather than a different app with a similar name.
- WordPad disappeared after a Windows update: Check whether its folder still exists. If the files are there, check where the shortcut points. If they’re missing, look in Windows Security’s protection history before restoring a backup.
- A document looks different: WordPad cannot preserve every feature used by a full word processor. Avoid saving over the original; use Save As to make a separate copy.
Should You Restore WordPad or Switch to a Modern Alternative?
If you only need WordPad for quick edits, getting it back may be enough. But if you work with longer documents or more complicated formatting, a modern editor will give you more tools.
Here’s a comparison to help you decide:
| App | Best for | Main limitation |
|---|---|---|
| Restored WordPad | Quick edits with basic formatting | Unsupported restoration on current Windows 11 |
| Windows Notepad | Plain text and Markdown notes | Doesn’t edit RTF as a formatted document |
| LibreOffice Writer | Free desktop editing of RTF and Word documents | Complex Word layouts may need checking |
| Microsoft Word | Documents that need Word’s formatting and features | Full desktop version requires a licence |
If you’d rather not bother with WordPad, these are some other options:
- LibreOffice Writer: A free, open-source word processor that opens and saves RTF, DOC, and DOCX files. Its file-format guide explains the supported formats.
- Microsoft Word for the web: Useful for browser-based editing, especially if your documents are already in OneDrive. Basic use is free with a Microsoft account, though it has fewer features and file-format options than desktop Word.
- Notepad: Good for quick notes. Newer versions include Markdown formatting, but that doesn’t make it a replacement for WordPad’s RTF editing.
- ONLYOFFICE Desktop Editors: A free desktop office suite with a familiar layout for people who often work with Office files.
Frequently Asked Questions (FAQs)
Why did Microsoft remove WordPad from Windows 11?
Microsoft announced WordPad’s retirement in 2023. Its notice recommends Word for rich-text documents and Notepad for plain text, but doesn’t give a detailed reason for the decision.
Can WordPad open DOCX files?
Yes. Later versions can open and save DOCX and ODT files, with limited formatting support.
Will WordPad receive updates?
A manually restored copy has no update service of its own. Putting the files back doesn’t restore Microsoft support for WordPad on your Windows 11 installation.
Did removing WordPad delete my documents?
No. Removing the app does not itself delete documents you saved with it. If an RTF file now has a blank icon or asks you to choose a program, it may simply need a new default editor.
Conclusion
If you miss WordPad’s simple layout, the methods above give you a few ways to try getting it back. Choose the one that fits what you already have, then check that the app opens and saves a test document properly.
Keep a backup of your WordPad folder and save your documents somewhere separate. For quick edits, it may still do what you need. If you regularly work with more complicated documents, LibreOffice Writer or Microsoft Word makes more sense.