
Slow PCs often test our patience when there a backlog of work and Windows computer won’t just keep up with your pace of things. Windows XP had things in order after the initial debacle with their first two service packs. Things smoothed out Service Pack 3 onwards.
Everything went south with the release of Windows Vista. Resource hogging, application incompatibility was the least of its problems. Vista introduced ReadyBoost, ReadyDrive and Superfetch to overcome the problem of memory ceiling, providing faster app loading, among other things to make the computer faster in operations for the user.
Also Read- How To Fix High CPU Usage And RAM Leakage In Windows 10
Note – SuperFetch has been renamed as “SysMain” process since the build 1809 RTM build 17763.1 of Windows 10 that released almost 2 years back. Users on older builds can still find the SuperFetch option in their services app.
Table Of Contents
What is Superfetch?
Superfetch is a caching technology feature that has a two-fold method to increase the available RAM for the applications and operating system to work on a higher scale of efficiency.
It is a successor to Microsoft XP’s PreFetcher which had the same goal with one key difference. SuperFetch increases the available resources by studying the usage pattern and making accommodations in the system accordingly, which sometimes helps in increasing the overall speed and efficiency of operations.
SuperFetch is applied to root path SystemRoot%\System32\Sysmain.dll in the form of a Windows services that itself runs under a Service Host process which can be found in the Task Manager.
First of all, SuperFetch emphasizes reducing boot-time and eventually enhancing the boot-up process.
Boot-up time is majorly dependent on the persistent interaction with Windows system files. SuperFetch streamlines the interaction by storing the files, data for boot-up in trace-files which significantly reduces the time required for locating and interaction with boot-up files.
SuperFetch also works with defragmentation that interfaces with file layout to boot-up files on the priority order of usage on the hard-disk. It performs the function once every three days. The required file layout is stored by the program in /Windows/Prefetch/Layout.ini.
Secondly, it works on reducing the launch time of the applications. It achieves that by preloading the frequently used application in your computer’s memory, based on usage patterns and routines. For instance, if you open Microsoft word > Excel > Opera web browser after turning on your computer and then Google Chrome, a few minutes later. It adapts and pre-load those programs to increase application launch speed.
Even though Windows has an in-built caching mechanism to be prepared for such functions, its function is rather limited. This is where SuperFetch comes on the top by analyzing, studying the usage pattern and adapting to it accordingly.
Do you need SuperFetch?
SuperFetch was launched, keeping in mind Vista’s requirement for excessive RAM for operations. As a result, the next-generation of the caching mechanism was released.
It is meant for reducing resource load on average, medium power computers. I’m talking about PCs with 2 GB, perhaps even 1 GB of main memory. Folks at Tom’s Hardware tested SuperFetch and had some impressive, positive results with low-end PCs with 2 GB of RAM.
Here is a check-list to consider to know if you need SuperFetch.
- SSD users may not see any noticeable difference in performance Windows 10 onwards. SSDs are at-least 5x times faster than a standard platter-based hard disk. MM2 SSDs are 5-10x times faster than a regular SSD. The boot-time of SSDs are 6-10 seconds on average for a standard SATA socket-based SSD in the market.
- To sum it up, if you have an SSD and running Windows 10, there is no significant need for using SuperFetch.
- Computers with 4 GB or less RAM may see a considerable difference in performance.
- Gamers who are playing new-age games with 4 GB or less RAM should consider keeping SuperFetch down south to avoid any unnecessary lag. Experts reason it with the game’s constant need for extra memory for the game which is not available due to SuperFetch reserving it for various purposes, etc.
- PCs with deteriorating hard-disk health should avoid using SuperFetch as it may result in further slowing down of the computer due to the sporadic presence of bad sectors on the hard-disk platters.
- Users with more free RAM, say 8 GB or above with regular HDD should give SuperFetch a try.
Is it safe to turn on/off SuperFetch
The answer to this lies with you. If your system does not show any sign of a slowdown, then it would be wise to keep it that way.
However, if you see full disk usage frequently as well as near-ceiling RAM consumption with almost no main memory left, then it might be time to turn SuperFetch’s knob off and observe the difference. Any unusual downgrade in performance would be the signal to disable SuperFetch for your computer.
How to Disable SuperFetch?
We do not encourage turning off SuperFetch since it helps in the overall improvement in the performance of the operating system. Use it at your discretion. As I have mentioned earlier as well, there is no need to turn it off unless there is a significant drop in performance.
There are two methods to disable SuperFetch(now SysMain.)
Disable via Services app
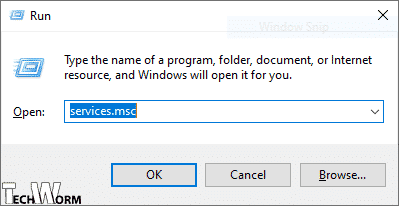
- Open RUN prompt by searching RUN in the start menu, or press Alt+R keys together. A Run prompt will appear on the screen.
- Type services.msc and press ENTER.
 Alternatively, you can search for services app in the start menu search and open the app. It does not work for many users for various reasons, so the method, as mentioned earlier works without fail.
 - Search for SysMain service if you are on 1809 RTM build 17763.1 and later on Windows 10, else search for SuperFetch service.

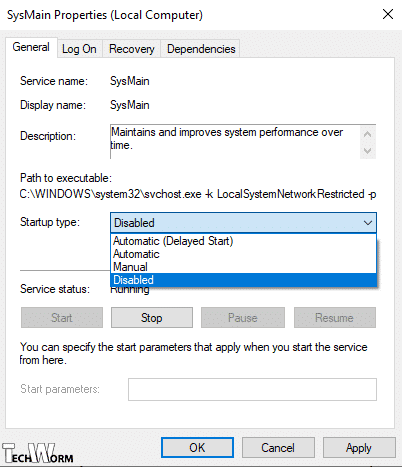
- Right-click on the properties of the service and a window will appear. Click on the Startup Type scroll-down menu where it should say Automatic by default. Please change it to Disabled. Next time your computer boots up, it will be disabled.
 Alternatively, if the scroll-down menu has Disabled or any other option by default, then change it with the utmost discretion.
 Alternatively, you can search for services app in the start menu search and open the app. It does not work for many users for various reasons, so the method, as mentioned earlier works without fail.
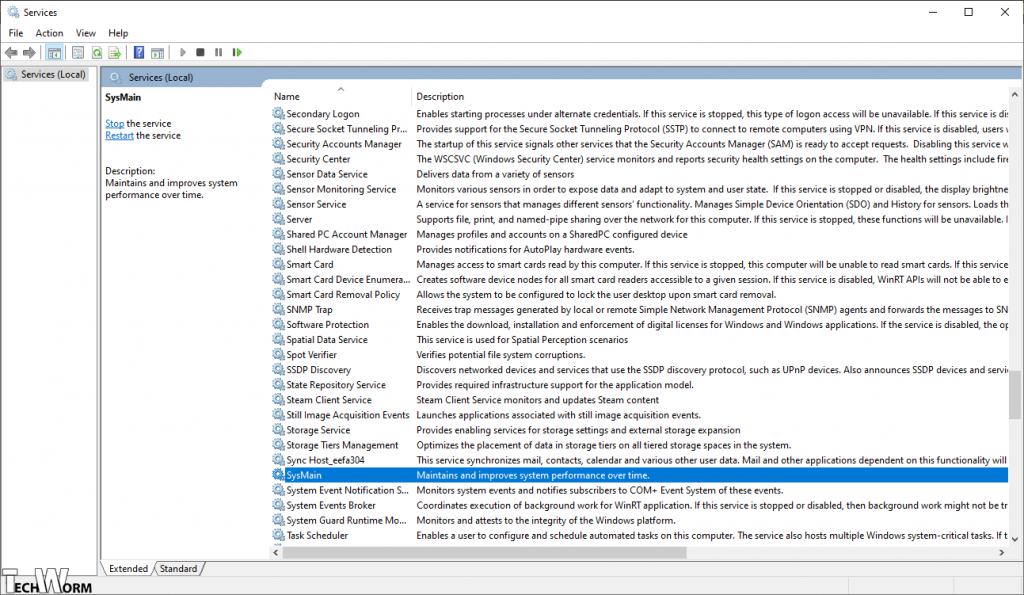
 Alternatively, if the scroll-down menu has Disabled or any other option by default, then change it with the utmost discretion.
Disable/enable via Registry editor
Before getting your hands on the registries, it is essential to create a backup of them to be on the safer side. You can take a backup of registries by going to File drop-down menu and clicking on Export. Save the backup in a secure location the storage with a proper name. Now, you are ready for the steps.
- Open the RUN prompt, as we mentioned earlier. Type regedit and press ENTER to open Registry Editor.

- Head to HKEY_LOCAL_MACHINE > SYSTEM > CURRENT CONTROL SET > CONTROL > Session Manager > Memory Management > SuperFetch key or Enable Prefetcher key

- The values are as follows
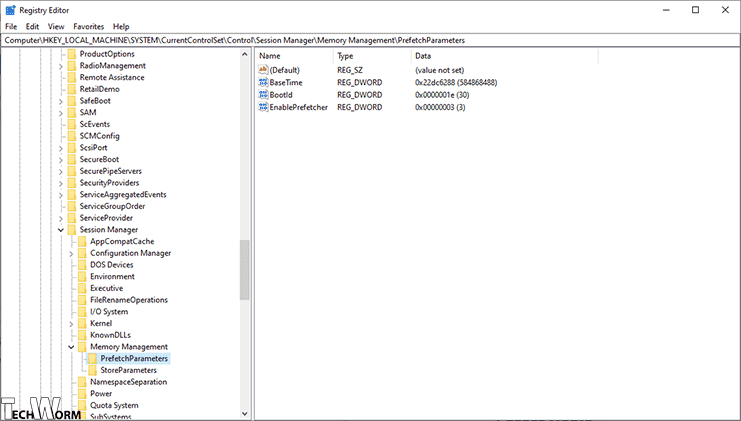
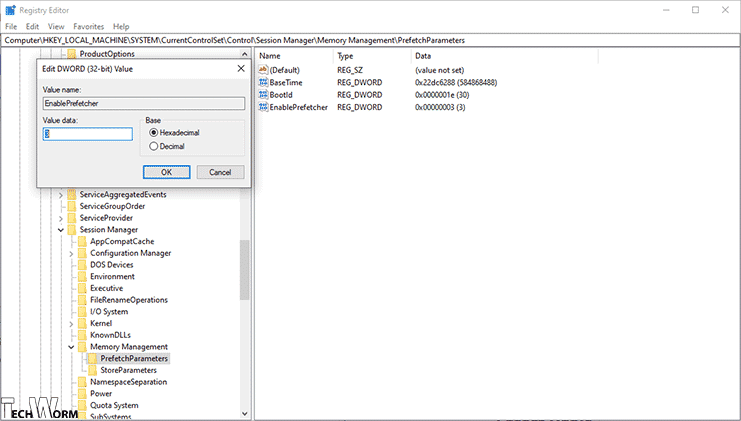
- 0 = Disable SuperFetching(if available)
- 1 = Application based prefetching enabled
- 2 = Boot prefetching enabled
- 3 = Prefetching enabled for everything
- Double click on the key and disable Superfetching/Prefetching by typing numeric 0. You can change it back to the previous setting if the performance feels out of place.
Over to You
SuperFetch is a next-generation caching mechanism that here to stay for the foreseeable future. Although it has been renamed to SysMain from build 1809 onward, the functionality is the same.
Even if your computer does not show promising improvements after dealing with SuperFetch feature, then it might be time to look at other factors, both in terms of software management and hardware performance benchmarking.
